EVP Management
The license management enables you to view the existing licenses of machines, to order licenses and to install them onto machines.
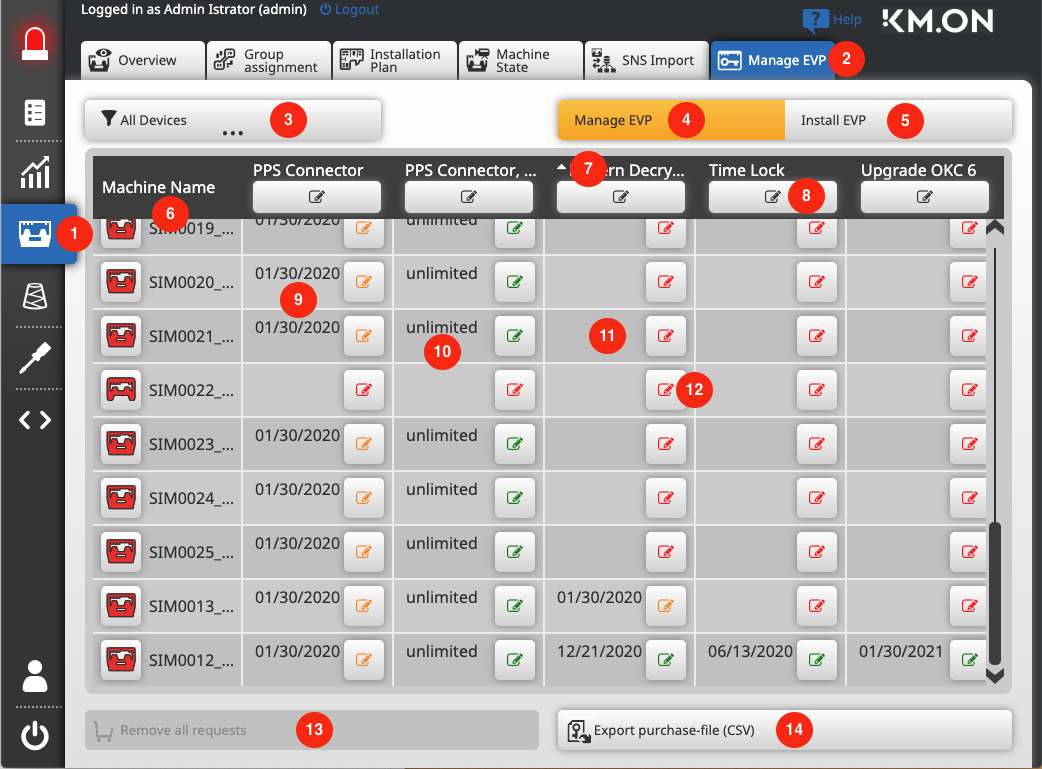
The license manager can be accessed via the main menu item (1) and den secondary menu item (2).
Manage Licenses
Licenses existing on the machines can be called up via the submenu item in the left (4) tab.
Here, an order file with new orders, extensions and cancellations can be created.
View Licenses
The (4) page displays a table with machines and their licenses.
Above the table there is a button to open filter dialogs (3) known from other views.
With the machine filter the view can be reduced to the machines that are relevant for one task.
The first column of the table lists the machine names (6).
The following five columns show the five available license types (7).
In the corresponding cells appear the expiration dates (9), if applicable.
These are exact to the day, whereby there is also the entry "unlimited" (10).
If one machine does not have a license, there is nothing specified (11). Nothing is specified as well, if a machine does not even know a license type.
Furthermore, in the cells, besides any existing expiration date there is a button to open an order dialog (12). This button is displayed only if the machine knows the corresponding license type, whether or not it has a valid, an expired or no license at all of this type. Only if the machine doesn't know the license type (older machines without software update) the button is not displayed.
The icon in the order button (12) can adopt three colors:
- Red means that the license expired or is not available.
- Orange means that the license expires during the following 100 days.
- Green means that the license is valid longer than 100 days (the reference date when creating this example was the 22.01.2020).
The table can by sorted by the expiration date of a license type. For this, the table headline (7) must clicked on.
It can be sorted in ascending and descending order. The sorting is symbolized by a small arrow in the heading. Clicking once means sort ascending (arrow upwards, later expiration date below), clicking twice means sort descending (arrow downwards) and clicking three times restores the original state.
Filter machines by licenses
The machine filter is also known from other PPS pages.
In the context of the license management there are two license related filters which are particularly interesting: Filtering by valid licenses and filtering by expiring licenses.
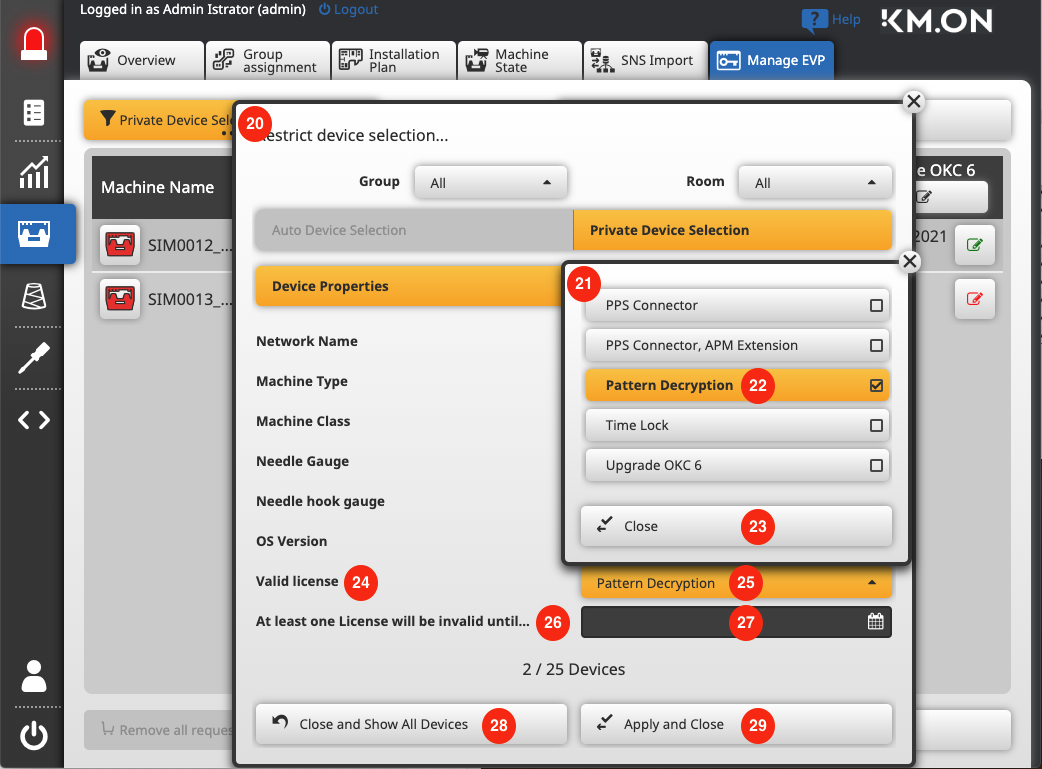
After clicking the filter button (3), the filter dialog box (20) is opened.
For filtering by valid licenses (24) all possible license types are displayed in a sub dialog box (21) after clicking the selection button (25).
Several license types can be selected in this sub dialog box (22).
This selection is inclusive (merging the results, logical OR-operation), i.e. all the machines are displayed that have a valid license for one OR the other selected license types.
The machine display is already filtered in the background during the selection.
After confirming (23) the selection, the sub dialog box closes. Now, further filter criteria can be set.

In the above mentioned example, the filtering was done by Pattern Decryption (22), (30).
- There are two machines that have a valid licence (the reference date when creating this example was the 22.01.2020).
- In the first example it can be seen, that the other machines have no licenses for Pattern Decryption, as the fields are empty (11).
For filtering by expiring licenses (26), a date is entered via the date picker (27).
- All the machines are filtered that have at least one license of this license type that will expire before this date.
- If the current date is entered, all the machines with an expired license will be displayed.
All filter criteria are interlinked in excluding manner.
- Intersection of all results, logical an AND link
- All machine which match the one criterion AND the other criteria appear.
Filter dialog closes with the Apply and Close button (29).
The filter criteria are saved per user for this page.
The Close and Show All Devices button (28) resets all filter criteria.
Order licenses
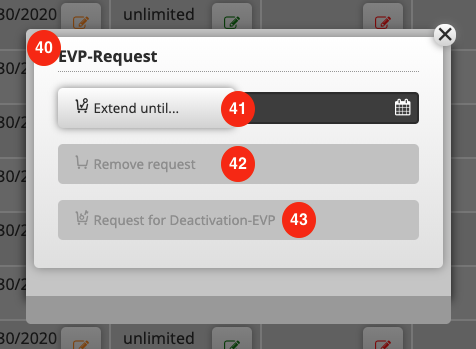
After clicking the order button (12) a order dialog (49) is opened.
Each license type column also has a button in the heading (8) for opening the same order dialog.
The difference is that the dialog applies only to one machine in the first case and to all appropriate machines in the second case.
All the machines that display this button in the table and also in the cells of this license type, i.e. know this license type, will be taken into account. In both cases, the entries in the order dialog are valid for one license type each.
The order dialog offers three options depending on the context:
- Extend the license (41)
For this enter a date that lies in the future and then click the Extend till.... - Remove Request (42)
In case, an order was already entered, it can be removed via this button. - Request a disabling EVP (43)
In case, a valid license is available, a disabling can be requested, e.g. when the machine is to be taken out of service.
Each time clicking a button in the Order dialog, the dialog box will be closed and the input will be applied to the table.
With the button Remove all requests (13) below the table, all entries can be undone.
Create order file
With the button Export order file (CSV), a CSV file can be generated with the entered data (14).
Install licenses
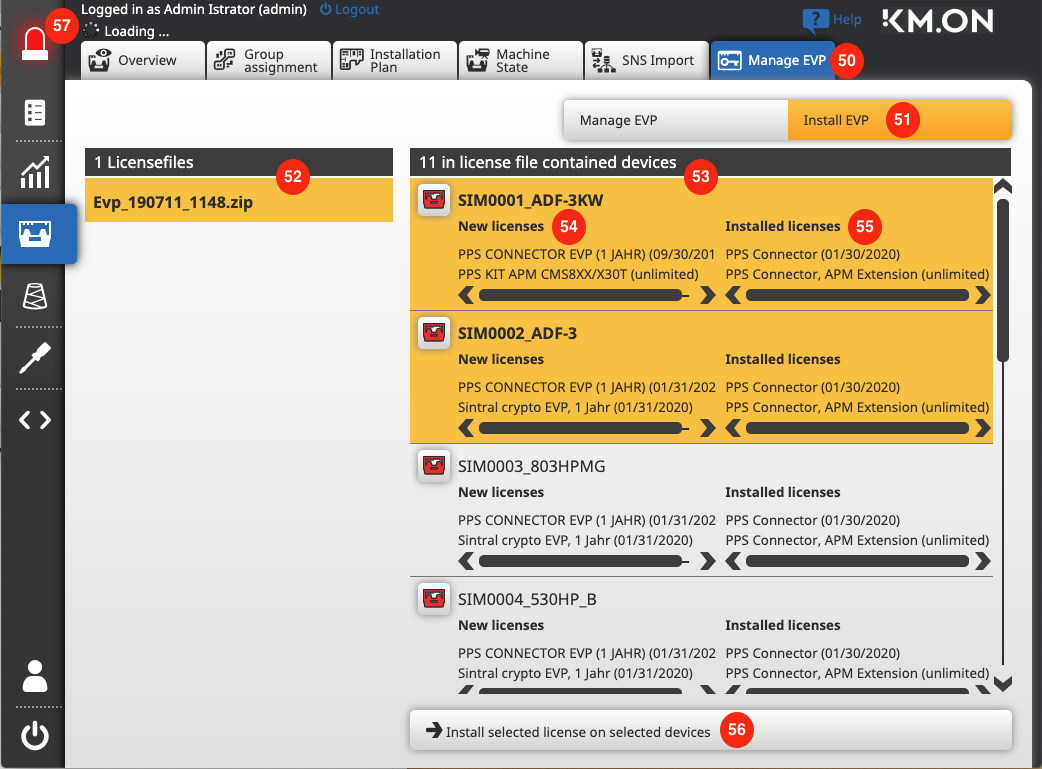
The content of license files can be viewed under the submenu item (50) in the right (51) tab.
Here it is also possible to install license files onto machines.
View license files
The page shows a list with the available license files (52) on the left side and a table with machines and their licenses (53) on the right side.
All the license files that are in the directory mentioned in the configuration will be displayed.
The set up of this directory is located under / / / . The default is \\<PpsServerName>\McFiles\MCOSUpdate\EVP
As soon as a license file (52) is selected (only single selection possible), all the machines mentioned in the file are listed in the table on the right side (53).
For each machine are displayed the licenses available in the file (54) and the licenses that are already installed on the machine (55).
Assign licenses
Based on the comparison of available (54) and installed (55) licenses, the user can decide if he wants to install the license file (52) with its available licenses onto individual machines.
For this the machine must be selected with one click. A multiple selection is also possible.
Install licenses on machines
- No machine selected
- The Install selected licenses on all machines (56) button is offered to send the license file only onto these selected machines.
- With it, you send the license file via Knit-Ftp to all machines.
- One or more machines selected
- The Install selected licenses on all machines (56) button is offered to send the license file only onto these selected machines.
- With it, you send the license file only to selected machines.
- This procedure runs in the background.
In case of transferring errors, messages appear in the message area (57).