Detailed description

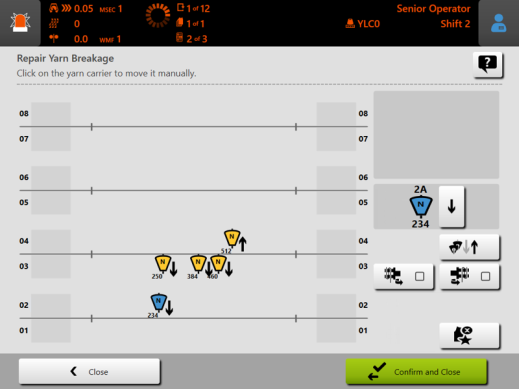
Repair yarn breakage:
- 1
- At which yarn carrier did the yarn breakage occur?
- 2
- Release the relevant yarn carrier.
Tap on the required yarn carrier. The icon changes from to
to  .
.
Tap the yarn carrier again. The icon changes from to
to  .
. - The yarn carrier plunger is switched off.
- 3
- Repeat step 2 if a yarn breakage occurred with several yarn carriers.
- 4
- Open covers.
- 5
- Push the respective yarn carrier by hand out below the carriage.
- 6
- Thread-up yarn carrier.
With a friction feed wheel: Switch on the respective feed wheel so that the yarn is running easily over the roller. Tap on the corresponding key . - The feed wheel is switched on for 60 seconds.
- 7
- Switch on again the yarn carrier plunger.
Select the yarn carrier (in the clamping and cutting bed) on the touch screen .
. - The yarn carrier plunger is switched on.
- 8
- Push the respective yarn carrier by hand below the carriage.
- It is positioned exactly if you here a "click". The yarn carrier is in the correct position below the carriage.
- 9
- Lead the yarn end opposed to the carriage direction.
- 10
- Hold the yarn end outside the danger zone (carriage)
- 11
- Push the carriage by hand until the yarn is fixed in the fabric.
- 12
- Cut-off the yarn end.
- 13
- Tap on the
 button if you want to start another fabric (Restart Fabric).
 After confirming, the machine automatically restores a defined state and restarts the fabric piece. The piece counter does not count down because the current fabric is defective.
 - 14
- Confirm the remedy of the yarn breakage
 (Confirm and Close).
 - The yarn breakage is repaired.
- 15
- Continue production.
To do this, close the covers and pull up the engaging rod.