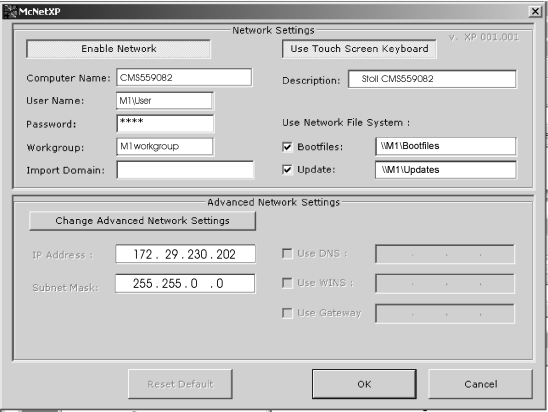
Entries in the Network Settings section of McNetXP.[Translation is no longer up to date]
Call up McNetXP:
- 1
- Press the Network Settings key of TC BASIC CONFIGURATION MENU.
- McNetXP opens with entry fields of the section.

|
Designation |
Meaning |
Description |
|---|---|---|
|
Computer name |
Machine Name |
You must enter a name in order for other network users to access this machine. This machine is identified with this name in the network. You can enter a description of this machine in the field. |
|
User name |
User name |
In order to use released system resources, this user must identify himself in the network with his password. Before you can access network resources, your network administrator must enter into the system a user name and the password linked to it. |
|
Password |
Password | |
|
Workgroup |
Workgroup |
So that the machines can communicate each other, all knitting machines must be in the same working group. This input field must be filled up. |
|
Import Domain |
|
You can import computer of an other workgroup (domain) into the workgroup of TC machines with Windows XP. |
|
Description |
Description |
Although entering a description is optional, it does help to identify machines more efficiently in larger networks.. Z.B. Type of the machine, gauge und other special features of the machine. |
|
Use Network File System |
Use Network File System |
|
|
Boot files |
Derictory for bootfiles |
The network drive is installed for updating the operating system of the Stoll TC knitting machines via network. This network drive is permanently connected to a directory released for all knitting machines in the network. This directory contains all the current versions of machine control software. |
|
Updates |
Directory for updates of the operating system |
Link to a shared directory on the net in order to install operating systems or harddisk images from there. Call up the installation in the Software Updating dialog box of the user interface. |
I. Use the virtual keyboard of McNet:
- 1
- Press the Use Touch Screen Keyboard button to use the McNet2/XP virtual keyboard.
- The button appearance becomes light (active).

When input fields are clocked on, the McNet virtual keyboard opens.
- 1
- Press the Use Touch Screen Keyboard button to use the McNet2/XP virtual keyboard.
When input fields are clocked on, the McNet virtual keyboard opens.
- The button appearance becomes dark (inactive).

Use connected keyboard for entry.
II. Enter the machine name (computer name):
- 1
- Touch the entry field.
-> The virtual keyboard of McNet appears with the entry field. - 2
- Enter any name desired (maximum 15 characters) for the knitting machine in the entry field.
- -
Maintain the standard setting.
III. Enter your user name and password:
Before you can access network resources, your network administrator must enter into the system a user name and the password linked to it.
Change the default setting and add a password.
- To use released resources in the network, this user must be logged on with his password in the network and in the respective system with the directories (M1).
- 1
- Touch the entry field.
-> The virtual keyboard of McNet appears with the entry field. - 2
- Enter the computer name and the user name in the field like this:
computer\user (maximum 15 characters). The computer represents hereby the central computer as specified in the entry field. - 3
- Touch the entry field.
-> The virtual keyboard of McNet appears with the entry field. - 4
- Enter the password for this user in the entry fields (maximum 15 characters).
-> A * (asterisk) appears for each character you enter.
IV. Enter a workgroup name:
- 1
- Touch the entry field.
-> The virtual keyboard of McNet appears with the entry field. - 2
- Enter the password for the workgroup or machine group in the entry field (maximum 15 characters).
- -
Maintain the standard setting.
V. Enter a description of the machine (Description)
- 1
- You can enter an additional description of this machine in the entry field (maximum 50 characters).
VI. Connect network drive permanently to a computer:
The network drive is installed for updating the operating system of the Stoll TC knitting machines via network. This network drive is permanently connected to a directory released for all knitting machines in the network. This directory contains all the current versions of machine control software.
The D:\Stoll\M1\Bootfiles\ of the M1 pattern workstation is also intended as default directory. (Share folders)
If the network drive Bootfiles has to be constantly connected when starting the machine, activate the check box .
- 1
- Click on the check box.
-> A check mark appears in the checkbox. - 2
- Touch the entry field.
-> The virtual keyboard of McNet appears with the entry field. - 3
- Enter a path in format \\<Computer name>\<directory> in the entry field to a central computer (e.g. M1) and a released directory.
Example:
|
|
entry field of McNetXP |
|---|---|
|
M1 Computer name: |
\\M1 |
|
Directory D:\Stoll\M1\Bootfiles |
\Bootfiles |
|
Complete entry |
\\M1\Bootfiles |
VII. Transfer or delete system entries:
- 1
- The entered data of all register cards are rejected with the key Cancel.
-> No change is made in the system, and all entries made are deleted. - 2
- To transfer entries to the system, press the OK key.
->This begins the installation process. - 3
- Delete the data entered with the Reset Default button and restore the default settings.
-> All entries made are deleted.