How to Backup the PPS Database
With the SKR3 software, the PPS Server Suite installs also a tool to setup the automatic live backup. You start the tool via the context menu of the green administration icon (Skr Tray Icon) in the right area of the status bar of Windows.
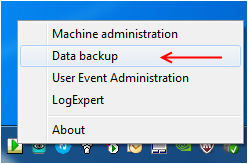
As an alternative, you can start the program also via Windows start button\All Programs\Stoll PPS\Data Backup Administration.
As the program needs administration permissions you will be asked by Windows whether you want to grant them. Please, confirm the prompt with Yes.
The Live Backup backups the complete PPS database in the background and permanently completes the Backup with the current changes during the day.
The database contains all the data of PPS:
- Information about Orders and Users
- Machines, Machine types, Floor plans, Groups
- Administrator settings of SKR3
- All messages and events of the machines
- Not contained are:
- Data in SNS
- Files in the PPS path
- Log file of SKR3
How to setup the backup service:
- 1
- Generate a directory on a external data medium, which is not integrated in the PPS server PC.
Accessible via the network or via an USB3.0 port. - 2
- Configure the security setting for this folder and give the local _Skr2DbUser user read and write permissions for this folder.
- 3
- Open the context menu of this folder in the explorer.
- 4
- Open the Properties dialog box.
- 5
- Open the Safety tab.
- 6
- Click on Edit button then Add and enter _Skr2DbUser.
- 7
- In the following dialog box check mark Change for Permissions and confirm all windows with OK.
- 8
- Ensure that this drive is available around the clock.
- 9
- Setup a _Skr2DbUser user in the domain or on the backup server with the password that you have specified during the PPS\SKR3 installation.
Default is Yaq#12345 - 10
- Open the context menu of this folder in the explorer.
- 11
- Select .
- 12
- Enter _Skr2DbUser above in the edit box and click on Add.
- In the window below appears the entry _Skr2DbUser.
- 13
- In the column replace the entry with and then click on Share.
- 14
- Proceed the same way to setup the read permission for the user that is logged on to the PPS server PC. Otherwise, in the Restore backup it will not be possible to see the current state of the backup or to list the directory, for ex., via the folder-search-button ... .
Notice:
In general you have to confirm the error message with Cancel.
- 15
- Re-apply the settings via Apply settings after the correction of the permission. Use OK only if you assume that the program was not able to determine correctly the permission.
- The backup folder is generated and provided with permissions .
- 16
- Enter the directory in the field or find it via the folder search button ....
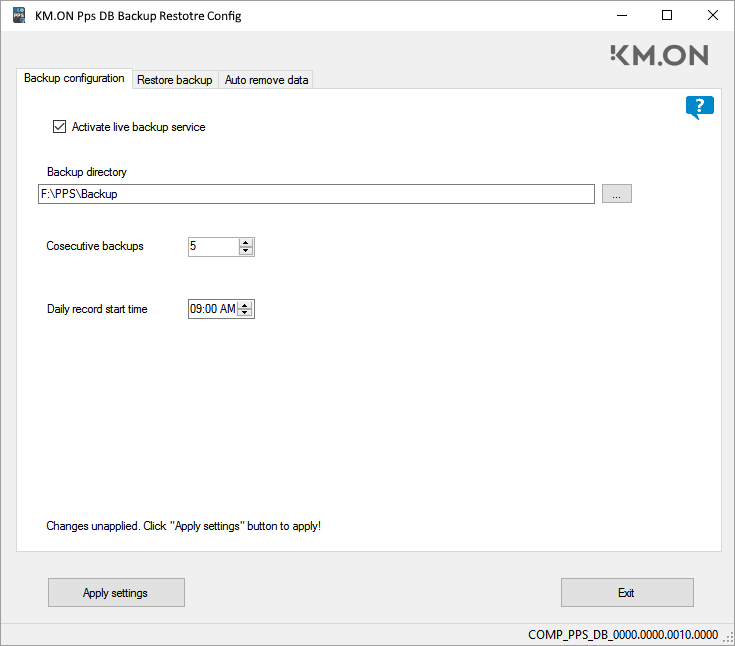
- 17
- Mark the checkbox.
- A new backup is generated each day at the time established under . At the beginning of the backup, a base backup is generated, which requires some CPU and disk resources. At this moment, the SNS database is backed up as well. For precaution reasons you can set a time, when it is a less busy time, for example a free or reduced shift, e.g. at 02:00 a.m.
- The backups are generated in a rolling way. Each day starts a new one until the number of consecutive backups achieve the number set under . After that the older backups are replaced. The default for the number of backups is 5.
- Having several backups is advantageous in case of a PPS hard disk damage with a complete unusable current backup. If backups from the previous day are available, the probability of being able to recover the PPS and to keep the data of the machines.
- Provide sufficient space on the backup drive for this number of backups. Over time your data will increase. Periodically check the available free memory space.
- 18
- After changes that were not applied, a note will appear at the bottom: .
- 19
- Click the Apply settings button.
- The program checks whether it has write permission for the specified folder and displays a message in case it is missing.
- 20
- Check the permission for the folder, otherwise no backup will be carried out.
- The backup service will generate a backup immediately.