Working with grouped corrections of the stitch cams NPGK
Step 1 Creating pattern on M1plus
The programmer gets the knitting program (zip file) generated by the M1plus correspondingly to the pattern with the stitch length groups. (Recommended)
|
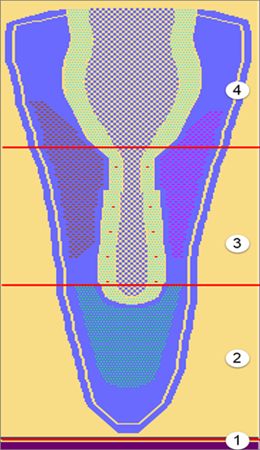
Example for stitch length groups | Areas | |
| 5 | NPGK5 |
For the binding thread: NP30 + NP31 | ||
4 | NPGK4 | |
For the area of the heel: NP13 – NP16 | ||
3 | NPGK3 | |
For the shank: NP9 – NP12 | ||
2 | NPGK2 | |
For the tip: NP5 – NP8 | ||
1 | NPGK1 | |
All stitch cam positions from start to net row: NP1, NP18 - 24 | ||
|
| |
Step 2: Set up pattern on the machine
The senior operator loads the knitting program (zip file) on the machine and starts setting-up the pattern. With it, he adjusts the pattern parameters as take-down and stitch length (NP values) in the Setup Editor accordingly to the desired quality.
How to make changes in the Setup Editor:
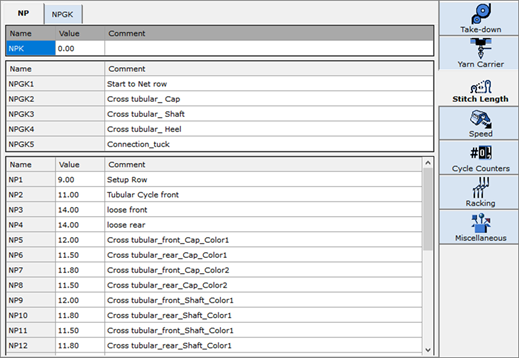
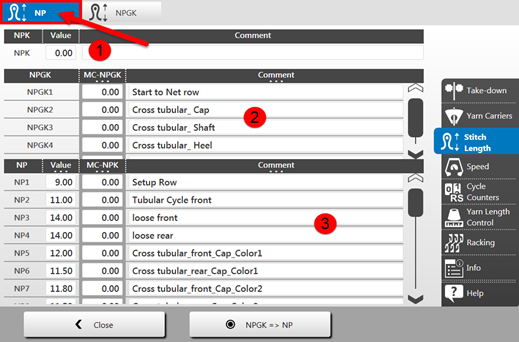
- NP tab
- Input of a correction value (NPK) for all NP values in use
- Input of a new NP value in the column
|
| ||
Table 1 | ||
NPK | Stitch cam correction for all stitch lengths (NP) used within the pattern | |
Value | Input of desired correction | Min. value: -2 |
Comment | Description of NPK value | |
| ||
Table 2 | ||
NPGK | List of all NP groups (NPGKn) used by the knitting program | n = 1 - 25 |
MC-NPGK… | Machine specific NP group correction values
| Minimum value: -2 Dongle Data |
| ||
Table 3 | ||
NP | List of all the used stitch lengths (NPn) | n = 1-250 |
Value… | Input of desired stitch length value | The value range depends on the gauge |
MC-NPK… | Machine specific NP correction values
You can set all entries to one value or to =0 (zero) by click on the table header MC-NPK.... | Minimum value: -2 Dongle Data |
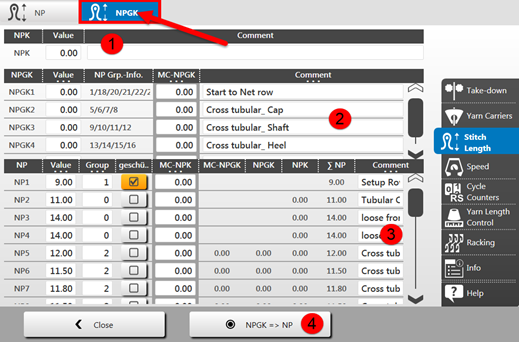
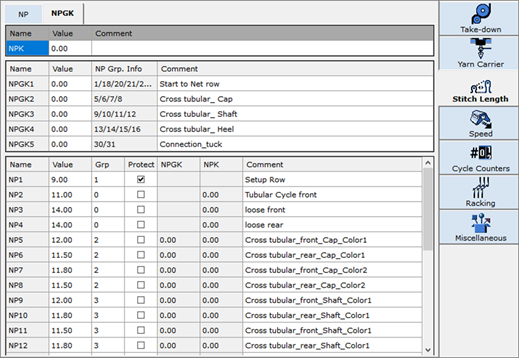
- NPGK tab
- Input of a correction value (NPK) for all NP values used in table (1)
- Input of a new NPGK value in the column
|
| |||
Table 1 | |||
| |||
| |||
Table 2 | |||
NPGK | List of all NP groups (NPGKn) used by the knitting program | n = 1 - 25 | |
Value… | Input of desired group correction value | Minimum value: -2 | |
NP Grp. Info | Display of the NP index that belongs to the group | ||
MC-NPGK… |
| ||
| |||
Table 3 | |||
NP | Name of NP Index | ||
Value… | Stitch length by NP values | ||
Group... | Specified NPGK index of the allocated group | ||
Protect |
| The entry is not protected
| |
| The entry is protected
| ||
MC-NPK… | Display of the currently on the MC effective stitch cam corrections |
| |
NPGK | Display of the currently effective stitch cam group corrections | ||
NPK | Display of the currently effective stitch cam corrections for all stitch lengths (NP) in use | ||
∑NP | Sum of the NP with all entered correction values,
|
| |
Step 3: Production
The desired quantity shall be produced after adjusting all machine parameters relevant for production by the  Senior Operator and achieving the desired quality when setting-up.
Recommended for production:
Apply the NPGK correction values set in the column of table 2) in theNPGK tab to the corresponding NP values by the  button.
(NP value + NPGK value = effective NP value)
Result:
- The effective NP value is shown.
- During production, the separate NP group correction is no longer available as the NPGK correction is already added to the NP value.
Attention!
If machine specific corrections (MC-NPK) are used additionally in the knitting program, they are not included in the NP values.
This information is shown in the NPGK tab of the Setup Editor and the ∑NP column indicates the sum of all values effectively used to form the stitches.
 : not visible in the pattern
 On the machine only!