Replacing gear racks in the step motor
There are different models depending on the machine type and the gauge.
Type 1
|
Valid for: |
|---|
CMS 530 |
Replacing gear racks:
- 1
- Remove the step motor.
- 2
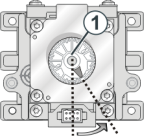
- Rotate positioning disk (1) to the mounting position (5 o'clock).
- 3
- Turn over the step motor and check the mounting position.
The adjustment is correct if
The upper gear rack (2) and the boring are aligned.
The lower gear rack (3) and the boring are aligned.
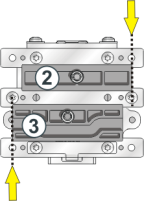
2 | Control of the stitch tension |
3 | Control of the pressure cams for tuck and stitch take over |
- 4
- Remove the screws (4) for the defective gear rack.

- 5
- Remove carefully the guide strips (5) and the gear rack.
- 6
- Replace defective gear rack.
- 7
- Mount the new gear rack and the guide bars.
- 8
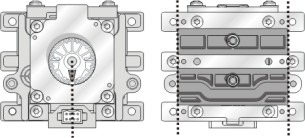
- Check whether the gear racks are positioned correctly. For this purpose, turn the positioning disk (1) to the home position (6 o'clock).
- The gear racks must be aligned.
- 9
- If this is not the case, repeat steps 2 till 8.
- The gear rack is replaced.
Type 2
|
Valid for: |
|---|
CMS 730 T |
Replacing gear racks:
- 1
- Remove the step motor.
- 2
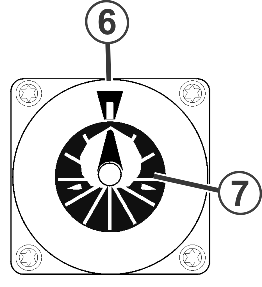
- Rotate positioning disk (7) to the home position (6).
- 3
- Set at the rear the left pin of the lower gear rack guide.
- 4
- Push lower gear rack manually to the left until all gear racks can be removed.
- 5
- Replace defective gear rack.
- 6
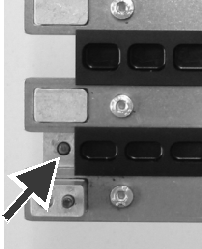
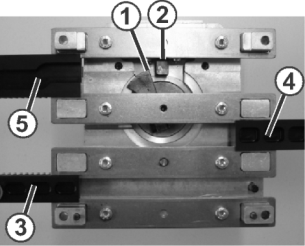
- Set the installation position. For this purpose, turn the serrated lock washer (1) in such a way that the right edge is positioned somewhat in front of the light barrier (2). (Visually expressed: if this setting is transferred to a clock, then it will show the time: 11:58)
- 7
- In this installation position, push in the gear rack (3) from the left until a light resistance can be felt.
- The gear rack contacts the pinion.
- 8
- Push in gear rack (5) as well.
- 9
- Push in gear rack (4) from the right until a light resistance can be felt.
- The gear rack contacts the pinion.
- 10
- Push gear rack (3) and (4) inward evenly.
- The gear rack (5) is automatically pulled inward while pushing the gear rack (4).
- 11
- Check whether the gear racks are positioned correctly. For this purpose, turn the positioning disk (7) to the home position (6).
- 12
- The gear racks must be aligned.

- 13
- If this is not the case, repeat step 3 through 11.
- 14
- Move pin of the lower gear rack guide at the rear to the home position.
- Replacement of the gear racks is complete.