Assembling carriage part and carriage support
I. Put the carriage part on:
- 1
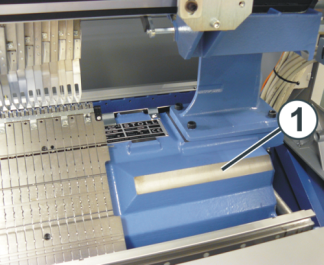
- Mount the carriage part on the left or right outside the needle bed in such a way that it contacts the support surface (1).
- Moving the carriage part over the movable parts of the clamping and cutting bed, will push the parts into their correct position with the help of the cam curve.
| Procedure |
|---|---|
Front needle bed |
|
Rear needle bed |
|
- 2
- Deactivate the power supply

 .
. - 3
- Press the
 Release drive brake [>!] button below
  수동
개입 2
수동
개입 2 - 4
- Push the carriage support exactly over the carriage part.
- 5
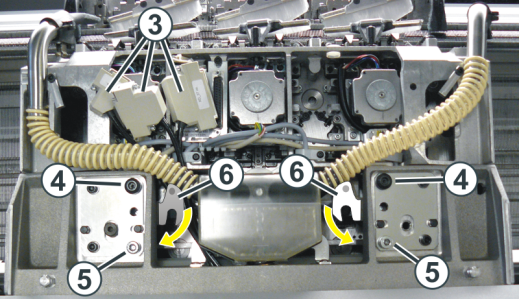
- Screw in the shoulder screws (4) until the carriage part lifts slightly.
- 6
- Swivel the left and right swiveling plates (6) outward below the carriage support..
- 7
- Tighten both shoulder screws (4) for fixing the carriage part.
 Assembly of the rear carriage part: pull the upper area of the carriage part (needle brushes) away from the needle bed to ensure that the shoulder screw does not cant.
 - 8
- Tighten screws (5) evenly.
- 9
- Plug in the plugs (3) while watching the plug coding.
- 10
- Tighten the screws at the plugs (3).
- 11
- Mount the suction tubes again.
- 12
- Assemble the carriage assembly panelling.
- 13
- Close the covers.
- 14
- Switch on the power supply.
- 15
- Exit the window with
 OK.
OK. - 16
- In the main navigation bar select the main area
 Set up Order.
 - 17
- Then, in the bottom navigation bar select Intervene Manually I.
- 18
- Press the
 Cancel Production [SPF S0] button.
- The knitting program is set to an empty row S0.
- 19
- Start the machine with the engaging rod.
- The yarn carriers move automatically back into their knitting position, then the carriage starts moving.
- 20
- Move the left carriage to the reversal point.
- 21
- Switch needle selection on if necessary
- 22
- With the
 Create Initial State button recover the initial state of the machine
- or -
Return to 오더 편집 to re-start the order.
 - 23
- Tap the
 작업 시작 key.