Adjustment of the lateral yarn guide
I. Adjust the yarn tension:
|
| |
|
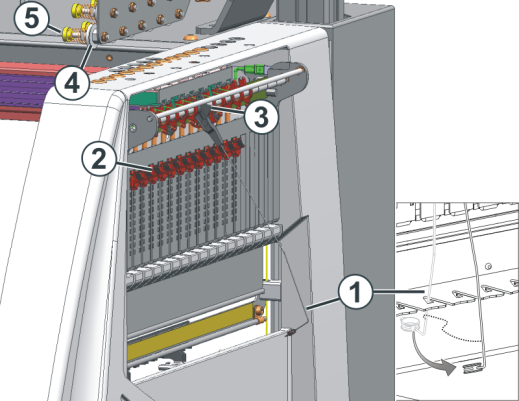
1 |
Yarn tensioner locked / unlocked |
|
2 |
Slider for the restoring force of the yarn tensioner |
|
3 |
Notched plate |
|
4 |
Brake disc of the permanent brake |
|
5 |
Knurled screw for the contact pressure of the permanent brake |
- 1
- Lateral Yarn Tensioner: Adjusting the restoring force on the linear regulator (2).
- 2
- Open permanent brakes (5).
- 3
- Adjusting yarn control unit.
- 4
- Adjusting permanent brakes (5).
- 5
- Lateral Yarn Tensioner: Adjust the yarn tensioning path at the notched plate (3).
II. Adjusting restoring force of the yarn tensioner
- 1
- Remove lateral yarn tensioner (1) from the stay.
- 2
- Linear regulator (2) is to be set in a manner that the lateral yarn tensioner has enough strength to hold the thread tensioned always.
- 3
- Control the setting while the machine is knitting.
In this case the thread must not sag rather it should always be tensioned by the yarn tensioner.
III. Adjusting permanent brake:
- 1
- Adjust the permanent brake in such a manner that the lateral yarn tensioner swivels only a bit (approx. 25 degrees)
If a thread loop is formed between the friction feed wheel and the permanent brake (on the inner side of the lateral safety door) then the yarn brake on the yarn control unit should be set a little stronger and the yarn brake should be set a little weaker.
IV. Set the yarn tensioning path of the yarn tensioner:
- The yarn tensioning path of the yarn tensioner can be set from 80 to 35 degrees.
- The yarn tensioning path is adjusted with the four lock positions of the notched plate (A-D).
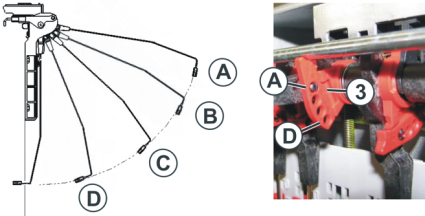
|
Position |
max. angle |
Function |
|---|---|---|
|
A |
80 ° |
Home position of the lock segment. |
|
B |
65 ° |
Active thread clamp in action. |
|
C |
50 ° |
Active thread clamp in action. |
|
D |
35 ° |
Active thread clamp out of action. |