Set height of yarn carrier
This adjustment of the yarn carrier is machine related!!
Additional pattern related adjustments may be required.
- You are signed in as Senior Operator
 .
. - Knitting program is loaded.
- The production was started.
- 1
- In the main navigation bar select
 Maintain Machine.
 - 2
- Select
 Service in the bottom navigation bar.
 - 3
- Tap the
 Yarn carrier key button.
 - 4
- Select the
 Adjust Vertically tab.
- The menu appears.
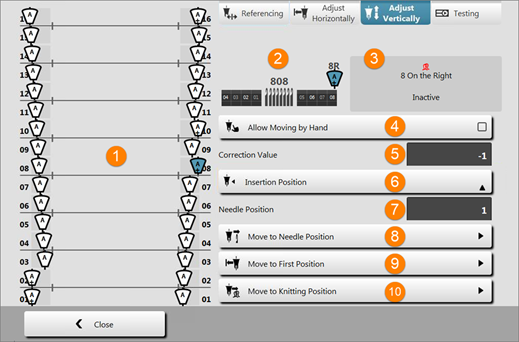
- 5
- Tap on the yarn carrier to be centered.
- 6
- Activate the Allow Moving by Hand
 button.
- or -
Interrupt the light curtain.
- 7
- Open the covers and manually move the yarn carrier to a position where the yarn carrier can be controlled well.
- 8
- Form a "needle cross"
- Manually
- With the help of the shims
- 9
- In the edit box (5) enter the desired correction value via the virtual numeric keypad.
|
|
Value range |
|
|---|---|---|
|
5 |
-1.0... 0 ... 3.0 Step width: 0.05 mm |
Default =0 |
- 10
- Check the height:
- Manually in the needle cross
- With the help of the shim
The yarn carriers are correctly adjusted if
- the thread is laid on the open latch at exactly the same point by each yarn carrier for both selvedge needles
- the yarn carrier tips move exactly between the needle beds in the needle cross and the distance between yarn carrier tips and the closed needle latch is 0.5 mm to 1 mm
- the yarn carriers of the track 1 and 16 are set additionally 0.5 mm higher so that they do not touch the limiters (3)
- the yarn carrier in the clamping and cutting area does not touch the cutting needle (4) located in the working position
