Yarn carrier correction for the weft yarn carrier
Definition of the weft yarn carrier
The weft yarn carrier is defined as a Q yarn carrier. This means that this yarn carrier works in vertical and horizontal direction with specified values.
Correcting the weft yarn carrier:
Recommendation for using the weft yarn carrier
For the optimal insertion of the weft yarn, the use of the weave-in device is recommended!
Due to this, the weft yarn is generally inserted with the System 1 (S1) as a yarn carrier correction may be necessary for optimization.
- You are signed in as Senior Operator
 .
. - Knitting program is loaded.
- The production was started.
- 1
- In the main navigation bar select
 Set-up Order.
 - 2
- Switch to
 Prepare Machine in the bottom navigation bar.
 - 3
- Open the Setup Editor with the
 button.
 - 4
- In the editor select the
 Yarn carrier menu.
 - 5
- Switch to the
 YC/YCI tab.
- The YC used in the pattern with all yarn carriers and all the additionally used yarn carrier corrections YCIn are displayed.
- 6
- Make changes in the YC table or in one of the YCIn tables.
- 7
- Scroll the display with
 or
or  if necessary,
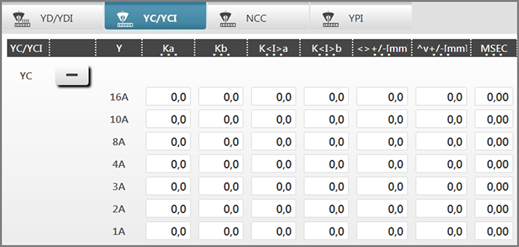
Column | Meaning | |
|---|---|---|
<> +/- [mm] | Horizontal correction of the insertion position (knitting position):
Positive value: Negative value:
| Minimum value: - 100 Step width: 0.1 mm |
^v +/- [mm] | Vertical correction of the insertion position (knitting position):
Positive value: Negative value:
| Minimum value: - 2.0 Step width: 0.1 mm |
 : Attention:
- 8
- Change the desired values:
- Horizontal value change in the <> +/- [mm] column
- Vertical value change in the ^v +/- [mm] column
- 9
- With the Close button exit the SETUP Editor.
- Changed values are saved in .setx when saving.
- 10
- Start the machine with the engaging rod.
- The changes will be carried out with the next use of the yarn carrier.