Coupling carriage assembly wide or narrow (CMS 822)

Both carriage assemblies can work together coupled wide in the tandem mode or coupled narrow.
The coupling width depends on:
- the fabric width
- the needed parking area for the yarn carrier between both fabrics
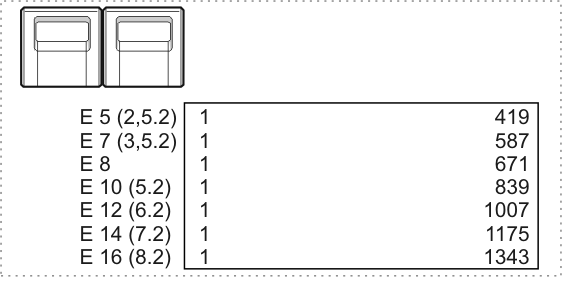
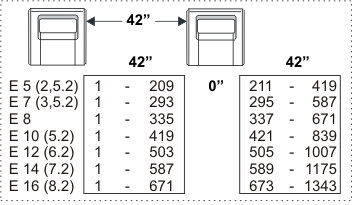
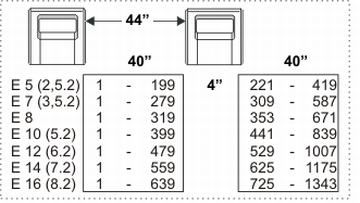
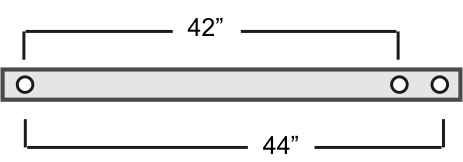
The following tables show you the relation between the coupling width, the fabric width and the parking area for the yarn carrier.
Needle area with 84" needle bed width
Coupling width 42"
Coupling width 44"
Couple Carriage Assembly Wide
- The order is finished.
An empty row is automatically set, the icon is shown in the information area.
- 1
- Start the machine with the engaging rod and stop it again when the carriage is located shortly after the left reversing position.
- 2
- Switch off 40 V power supply.
- 3
- Open the locking of the rear panel segments with the square spanner from the enclosed accessories and remove the segments.
- 4
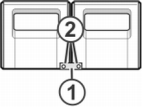
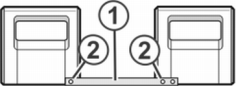
- Remove the screws (2). Remove the coupling rod (1).
- 5
- For wide coupling (tandem machine), push the right carriage to the right until the coupling rod (1) can be assembled.
- 6
- Insert the screws (2) and tighten.
- 7
- Remove the carriage part in order to replace the cams.

- 8
- Place carriage part on contact surface and assembly with carriage assembly.
- 9
- Close the rear panel.
- 10
- Switch on 40 V power supply.
- 11
- Confirm the input with .
- 12
- Start the machine with the engaging rod.
- The carriage stops and the error appears.
- 13
- Start the machine with the engaging rod.
- Carriage assembly runs in the creep speed. The control adjusts to the new coupling width.
- 14
- Stop the carriage in the left reversing point again.
- 15
- Open the menu.
 Configurar a
máquina
Configurar a
máquina 
 Opções Funções
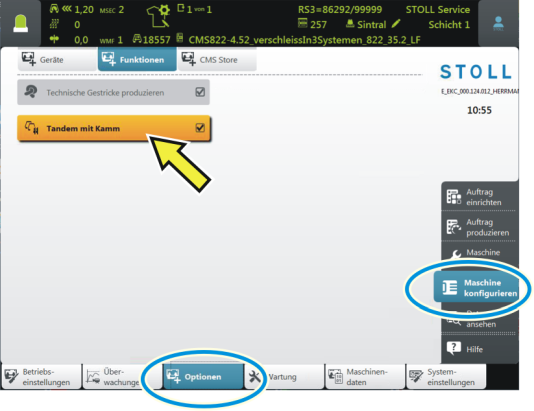
- 16
- Tandem com pente
Check the setting and change if necessary. - The comb and clamping / cutting are activated.
 - The comb and clamping / cutting are deactivated.
- Load the knitting program.
If the carriage assembly operate coupled wide, all needles outside the fabric pieces must be free of fabric.
All yarn carriers must be positioned.
Couple Carriage Assembly Narrow
- The order is finished.
An empty row is automatically set, the icon is shown in the information area.
- 1
- Start the machine with the engaging rod and stop it again when the carriage is located shortly after the left reversing position.
- 2
- Remove the carriage part in order to replace the cams.

- 3
- Place carriage part on contact surface and assembly with carriage assembly.
- 4
- Open the locking of the rear panel segments with the square spanner from the enclosed accessories and remove the segments.
- 5
- Remove the screws (2). Remove the coupling rod (1).
- 6
- For narrow coupling (tandem machine), push the left carriage assembly to the right and hook in the coupling rod (1).
- 7
- Insert the screws (2) and tighten.
- 8
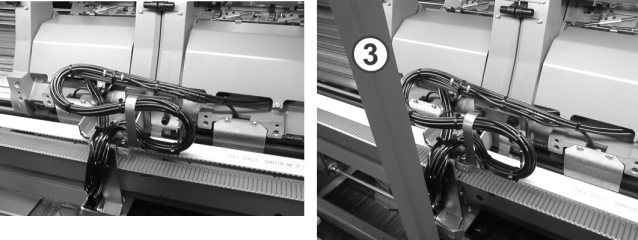
- Lay the cable harness into the retainer. This prevents the cables at the support (3) from rubbing and being damaged.
- 9
- Close the rear panel.
- 10
- Switch on 40 V power supply.
- 11
- Confirm the input with .
- 12
- Start the machine with the engaging rod.
- The carriage stops and the error appears.
- 13
- Start the machine with the engaging rod.
- Carriage assembly runs in the creep speed. The control adjusts to the new coupling width.
- 14
- Stop the carriage in the left reversing point again.
- 15
- Open the menu. Configurar a
máquina Opções Funções
- 16
- Tandem com pente
Check the setting and change if necessary. - The comb and clamping / cutting are activated. - The comb and clamping / cutting are deactivated.
- Load the knitting program.