Cleaning the Knitting Machine
To ensure the operability of the knitting machine and ensure the quality of the fabric, the knitting machine must be cleaned regularly.
|
Cleaning interval |
Cleaning work |
|---|---|
|
if necessary |
Cleaning the touch screen |
|
6-24 operating hours |
Cleaning suction and lint container |
|
daily |
Vacuuming off knitting machine |
|
100 operating hours |
Cleaning main drive fan |
|
once a month |
Cleaning fan and radiators in right control unit |
|
2 months |
Quick cleaning of the clamping and cutting device |
|
3 to 6 months |
Thoroughly cleaning needle bed |
|
6 months |
Clean the knitting systems Thoroughly cleaning the clamping and cutting device |
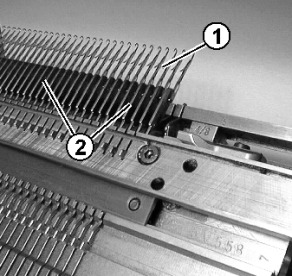
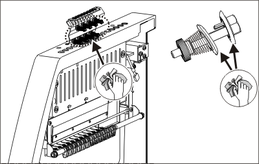
I. Clean needle beds:
- 1
- Stop the knitting machine.
- 2
- Push up all needles completely.
- 3
- Vacuum off dirt in the area of the needle hook / pelerine spring (1) and in the area of the needle bed (2).
In order to avoid any dust being deposited on the inaccessible points of the machine, we recommend that the dust should be vacuum cleaned and the machine not to be cleaned by compressed air.
CẨN THẬN

Damage of needles!
The spring-mounted needle latches will be damaged if the needles are blown out with compressed air.
- Always vacuum fluff and dust off the needles, never blow them out.
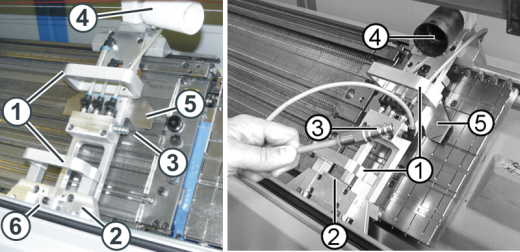
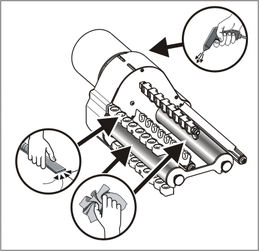
II. Cleaning with cleaning apparatus:
The cleaning apparatus is used to clean the needle hooks and the holding-down jacks.
The cleaning apparatus is machine and gauge dependent. The cleaning apparatus can be adapted to the gauge of the needle bed by replacing the cam.
|
|
Function |
|---|---|
|
1 |
Handles |
|
2 |
Guide assembly |
|
3 |
Connection for compressed-air |
|
4 |
Connection for suction |
|
5 |
gauge dependent cam |
The cleaning apparatus is mounted on the right or left of the front needle bed and then pushed over the needle bed by hand.
If a thread clamping and cutting device is installed on the needle bed, the cleaning apparatus is mounted over the thread clamping and cutting device.
CẢNH BÁO
Dangerous operation!
Operation requires the observance of security measures
- Observe the operating instructions of the cleaning apparatus by all means.
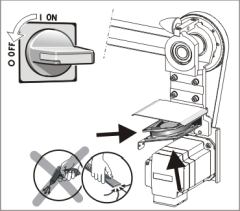
III. Clean the main drive fan:
- 1
- Set the main switch to 0 and wait until the touch screen is dark and an alarm signal sounds.
- 2
- Swing open the cover on the right-hand control unit.
- 3
- Clean fan (1).
- 4
- Close the cover on the right control unit.
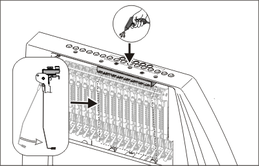
IV. Cleaning the active thread clamp:
- 1
- Bring the lateral yarn tensioner in still position.
- Thereby the active thread clamp is open.
- 2
- Blow the eyelets in the lateral safety door by compressed air.
V. Cleaning the permanent brakes:
- 1
- Clean both the brake settings of each permanent brake with a cloth.
- 2
- The permanent brake can be dismantled and blown out with compressed air if it is very dirty.
- 3
- For this purpose, pull the adjusting lever of the permanent brake outwards and simultaneously press the lug of the permanent brake on the inner side of the safety door.
- The permanent brake flaps underneath.
- 4
- Blow out the permanent brake with the compressed air.
VI. Cleaning the friction feed wheel:
- 1
- Vacuum off the fluff and dust from the friction feed wheel.
- 2
- Remove dirt (e. g. paraffin) from the friction rollers.