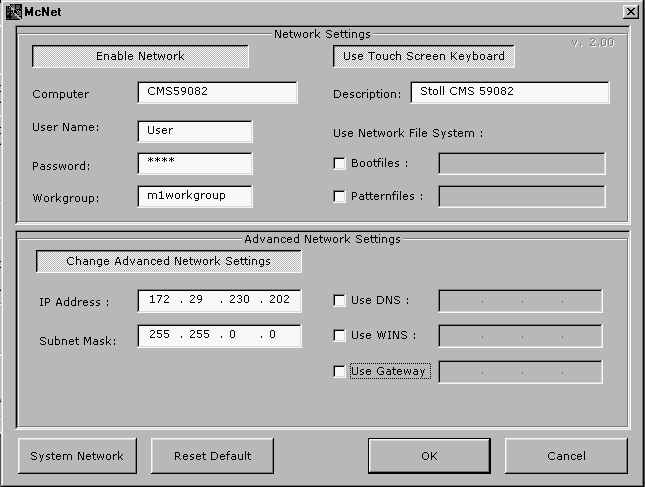
Entries in the Advanced Network Settings section of McNet/XP[Translation is no longer up to date]
To display settings in the tab or to define new settings, start the McNet2/XP program.
The entry of an IP address and of a sub network mask is only necessary if you do not want to keep the default settings.
After the initial installation of the McNet2 program or with machines from October 2003 on the corresponding functions can be run with the Network Settings button in the TC BASIC CONFIGURATION MENU dialog box.

|
Designation |
Meaning |
Description |
|---|---|---|
|
IP adress |
IP address |
Each machine (computer) should have a unique IP address within a network. The TCP/IP network protocol uses this address to communicate with the machines. The division of the network is done in the so-called network classes. |
|
Sub-Net Mask |
Sub-Net Mask |
The McNet2/XP automatically enters a value for subnet mask Class B in this field. |
|
Use DNS |
Use DNS |
Domain Name Services via DNS server |
|
Use WINS |
Use WINS |
Windows Internet Name Services. |
|
Use Gateway |
Use Gateway |
A Gateway enables the connection between the shared networks. |
I. Check and transfer of the IP-address (IP-Address und Sub-Net Mask) :
The McNet2/XP attributes automatically an individual IP address to each machine and displays it here.
- 1
- Check the IP address.
Check the IP address according to the Summary table or enter the actual address into the table. - 2
- Check the Sub-Net Mask.
Check the Sub-Net Mask according to the summary table or enter the actual address into the table.
Background:
Each machine (computer) should have a unique IP address within a network. The TCP/IP network protocol uses this address to communicate with the machines.
The McNet2/XP program automatically enters the relevant values as per this convention for each machine for the and the .
|
Network classe |
IP addresses from |
to |
Subnet mask |
Number of units in the subnet |
|---|---|---|---|---|
|
Class B |
172.29.1.1 |
172.29.254.254 |
255.255.0.0 |
max. 64.516 |
II. Change the :
- 1
- Click on the check box.
- 2
- Touch the entry field.
-> The virtual keyboard of McNet appears with the entry field. - 3
- Adapt the IP address in the 4th or 3rd + 4th value in the entry field.

However, you may also enter company-specific values in the field. Ask your network administrator for a free IP address.
III. Change the :
The McNet2/XP automatically enters a value for subnet mask Class B in this field.
However, you may also enter company-specific values in the field.
Ask your network administrator for the .
- 1
- Touch the entry field.
-> The virtual keyboard of McNet appears with the entry field. - 2
- Change the address in the entry field.
IV. Individual network settings for Windows (with McNet2 only):
- 1
- Press the System Network Configuration key from the system control (Control Panel) to start the Network Configuration dialogue box. You can carry out your settings specific to the network in the displayed register cards or install the TCP/IP protocol newly.
You will get an instruction of the Network Configuration dialogue box in the Windows Help.
V. Apply or delete entries:
- 1
- The entered data of all register cards are rejected with the key Cancel.
-> No change is made in the system, and all entries made are deleted. - 2
- To transfer entries to the system, press the OK key.
->This begins the installation process. - 3
- Delete the data entered with the Reset Default button and restore the default settings.
-> All entries made are deleted.