Setting up a network in Windows 2000 (M1):[Translation is no longer up to date]
I. View or enter IP addresses:
The following description applies for Windows 2000.
The procedure in other Windows operating systems may be deferent. Refer to the Windows Help in this case.
- You must be logged on either as an administrator or as a member of the "Administrator" group.
- 1
- To open network and telecommunication transfer connections click on Start and point your mouse to . Then click on .
- 2
- Double-click on Local area connection.
- The Local area connection status dialog appears. - 3
- Click on Properties to display the Local area connection properties.
- 4
- Select or activate Activated components ...Internet protocol (TCP/IP).
- 5
- Click on the Properties key.
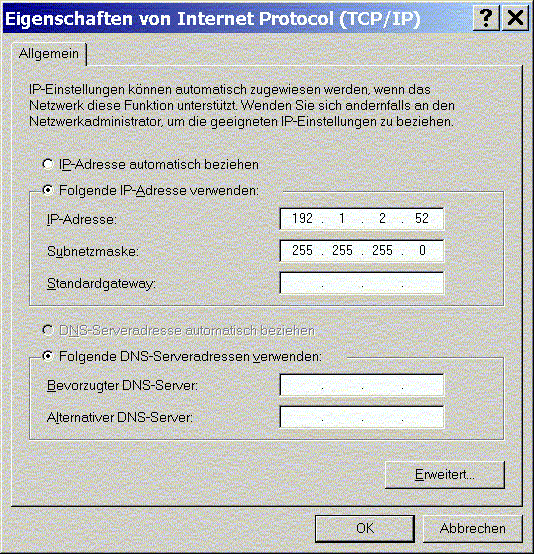
The Internet protocol (TCP/IP) properties dialog box is displayed. - 6
- Enter addresses, as per their Listing, in the IP address entry field in the General tab.
Each unit (computer) within a given network must have a unique IP address. The TCP/IP network protocol uses this address to communicate with individual computers.
The division of the network is done in the so-called network classes.
Class B is for medium-sized and larger networks (more than 254 machines).
Class C (described here) is for smaller networks (up to 254 machines).
Certain addess areas are set aside in each of these classes for use in the Intranet:
|
Network class |
IP addresses from |
to |
|---|---|---|
|
Class C |
192.168.0.3 |
192.168.255.254 |
The Ethernet IP addresses 192.168.0.1 and 192.168.0.2 are exclusively reserved for OKC machines and must not be used in the companies network.
Enter the relevant values as per TCP/IP conventions in the field in such a way that only the IP addresses need to be entered.

- 7
- Confirm with OK.
- 8
- Confirm the Properties of local area connection dialog with OK as well.
II. Enter the name of the computer and workgroup:
You must enter a name in order for other network users to access this unit. This name identifies the unit in the network.
Upon delivery of the M1 pattern workstation, the name and a consecutive machine number (e.g. STOLL 1711) are pre-set on STOLL. This pre-set value remains unchanged, thereby making this name absolutely unique.
All knitting machines, analysis computers and patterning units must be in the same workgroup so that all units can communicate with each other. If you work in a company-wide network, ask your network administrator for a suitable workgroup name. It is unnecessary to set up different workgroups.
Preset values upon delivery: WORKGROUP. This setting can remain unchanged.
The following description applies for Windows 2000.
The procedure in other Windows operating systems may be deferent. Refer to the Windows Help in this case.
- 1
- Click on Start and point your mouse to Then double-click on .
- 2
- Double-click on the System
 icon.
icon.
The System properties dialog is displayed. - 3
- Open the Network ID tab.
-> The computer name and workgroup are displayed. - 4
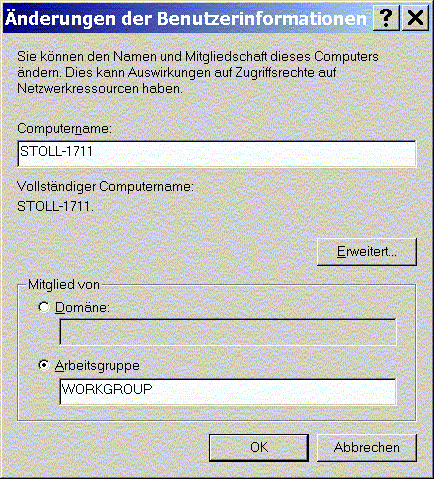
- Open the Changes in user information dialog with the Properties key.

- 5
- The preset Computer name is displayed in the entry field.
You can enter another computer name (maximum 20 characters) that is unique for your network. - 6
- The preset name of the workgroup is displayed under Member of.
You may enter another workgroup. All units that are in communication with each other must be part of the same workgroup. - 7
- Confirm entries with OK.
-> The entries take effect only after you restart the computer.