Updating the PPS Server Suite
Before updating the PPS Server Suite, always generate a backup of your data.
Previously to a release by Stoll, the update is tested intensively. Nevertheless, it is not possible to fully exclude the risk of operating conditions leading to malfunction. In order to limit the risk to your production operation, it is recommended to install and test the update and its suitability first of all on a parallel PPS installation connected for example to some patterning machines.
- Update at times of low load at the PPS.
Producing machines might not be able to access files and the necessary services might be out of order during updating. - An update will not always be compatible downwards. After an update you can recover an older state only to a limited extent without data loss and often times only if you carried out a backup of the data state previously to the update. This applies to the PostgreSQL (PPS and SKR), SQ-Lite (SNS) databases and to the files, which you modified.
- You will find the information about the exact procedure for carrying out the respective update in the support documentation for the update.
- Variant 1 uses an update batch file matching most of update cases.
- For this purpose, the variant 2 uses the repair function via the setup of a set on current installation files.
Repairing the installation
How to Update the PPS Server Suite by Update Batch:
- The update is to be performed via a batch program.
- You have chosen an appropriate moment.
- You have generated a data backup (see How to Create a Copy of the Current Backup).
- You have downloaded the PPS update (e.g. PpsUpdate (V_PPS_001.010.004_STOLL).zip) from the STOLL customer-net. The Zip file contains the update folder with all the necessary files.
- 1
- Unzip the Zip file to the D:\PPS\PpsJBossServer\PpsServerInstallScripts\ folder.
- 2
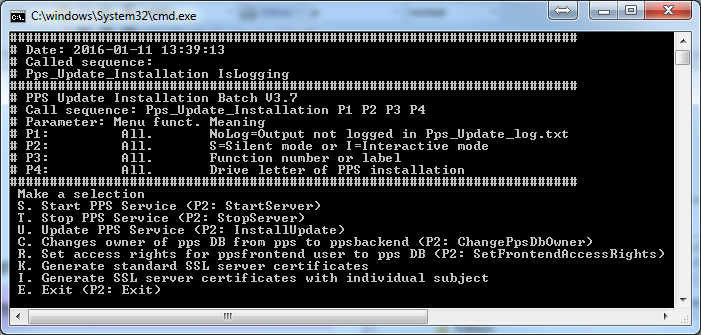
- Start the batch file (e.g. D:\PPS\PpsJBossServer\PpsServerInstallScripts\PpsUpdate (V_PPS_001.010.004_STOLL)\Pps_Start_Update_Batch.bat) with administrator rights.
For this purpose, open the context menu of the file and select . - You will see the following window with a menu

- 3
- Select the option u to start the update.
- The update is being executed.
After finishing, you will see again the menu. - 4
- Start the PPS with the option s.
- After approx. 2 minutes the PPS is again online.
Depending on the number of machines, the Recovery will take a while until PPS gets the ticket state of the machines synchronized. The machines will be available for scheduling only then. Avoid to add new orders in order to be scheduled during this time.
- The update is finished and you can exit the batch program with the option e.
- The modified files will be saved in the folder similar toD:\PPS\PpsJBossServer\PpsServerInstallScripts\PpsLast\PpsSwUsedTill_2015-11-27_15_20_50 For each update there will be generated such a folder with a time stamp when the update was started. These files can be used to restore this state if necessary.