Thoroughly cleaning needle bed


If the needle bed it not cleaned thoroughly and carefully, a non-uniform stitch appearance results during production due to needles that do not run smoothly, and the operation of the machine can no longer be ensured.
Thoroughly cleaning the needle bed:
- No fabric may be hanging on the needle bed.
- 1
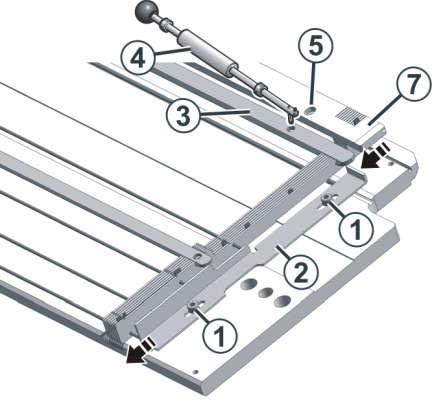
- Loosen both screws (1) and move the strip (2) downwards.
- 2
- Remove all needle rails (3) with the extraction hook (4).
- 3
- Remove all screws (5) of the jack bed.
- 4
- Take off jack bed (7).
- 5
- Remove needles, coupling part, intermediate slider and selector jacks.
NOTICE

Dirt-caked needle channels due to oil or cleaning agent!
When the needle channels are cleaned with oil or cleaning agent, the dirt swells up and clogs the needle channels.
- Do not clean needle channels with oil or cleaning agent.
- Push dirt out of needle channels and blow out needle channels with compressed air.
- 1
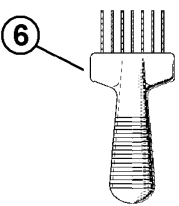
- Remove dirt out of needle channels, for example with a groove cleaner (6).
- 2
- Clean groove for pelerine spring of needle.
- 3
- Blow out dirt with compressed air from the needle bed.
- 4
- Check whether needles, coupling part, intermediate slider and selector jacks are undamaged.
- 5
- Clean needles, coupling part, intermediate slider and selection jacks with oil.
- 6
- Reassembly needle bed.
- 7
- Lubricate needles, coupling part, intermediate slider and selector jacks. If a central lubrication is installed, then use the setting for approx. 15 minutes.