Threading-up the ADF Yarn Carriers
For doing this, proceed as follows:
- 1
- Open the covers.
- 2
- Move the yarn carrier to a position where it can be threaded-up easily.
Outside of the knitting area e.g. - 3
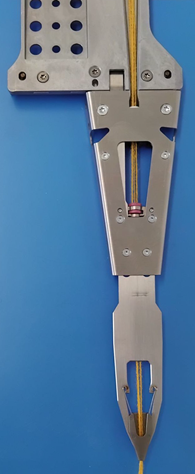
- Thread-up the yarn carrier.
Use the threading aid (1) for it. The threading aid is included in the accessories.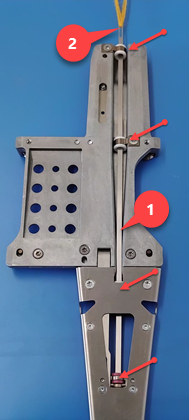
- 4
- Push the threading aid downward through the eyelets.
- 5
- Form a thread loop (of about 1 ft) through the eyelet of the threading aid (2).
- 6
- Pull the threading aid down out of the eyelets.
- 7
- Unthread the threading aid and thread-up the yarn manually into the clip tip.
- 8
- Hold the yarn end.
ОПАСНОСТ

The yarn carrier returns to its knitting or clamping position!
Danger of crushing and cutting by yarn carrier movement.
- Yarn carriers that have been moved manually will automatically return to their previous position when the engagement rod is pulled.
- Do not reach in the area of the yarn carriers.
- Pull the engaging rod upward to the reduced speed only.
- 9
- Carefully pull the engaging rod upward.
- The yarn carriers return automatically to their knitting or clamping position.
- If the yarn carriers are in their knitting position, the carriage starts moving and inserts the thread in the needles.
- 10
- When the thread is inserted securely in the needles, release the engaging rod.
- The carriage stops.
- 11
- Release the yarn end and close the covers.
- 12
- Keep moving the carriage until the reversing position is reached and stop it.
- 13
- Remove the yarn end.
- 14
- Continue the production or begin a new fabric.
- 1
- Open the covers.
- 2
- Move the yarn carrier to a position where it can be threaded it up easier - for example outside the knitting area.
- 3
- Thread up yarn carrier.
Use the threading aid (1) for it. The threading aid is included in the accessories. 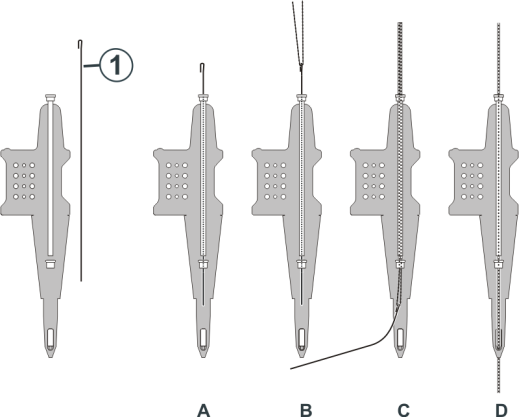
- 4
- Push the threading aid downward through the little yarn tube (A).
- 5
- Form a thread loop (B) (approx. 30 cm), double the thread for it.
- 6
- Pull the threading aid downward (C).
- 7
- Unthread the thread loop and thread it manually into the yarn carrier tip (D).
- 8
- Hold the yarn end.
ОПАСНОСТ
The yarn carrier returns to its knitting or clamping position!
Danger of crushing and cutting by yarn carrier movement.
- Yarn carriers that have been moved manually will automatically return to their previous position when the engagement rod is pulled.
- Do not reach in the area of the yarn carriers.
- Pull the engaging rod upward to the reduced speed only.
- 9
- Pull the engaging rod upward cautiously.
- The yarn carriers move automatically back into their knitting position.
- 10
- If the yarn carriers are in their knitting position, the carriage starts moving and inserts the thread in the needles.
- 11
- When the thread is inserted securely in the needles, release the engaging rod.
- The carriage stops.
- 12
- Release the yarn end and close the covers.
- 13
- Keep moving the carriage until the reversing position is reached and stop it.
- 14
- Remove the yarn end.
- 15
- Continue the production or begin a new fabric.