Centering a yarn carrier
I. Checking the centering:
- You are signed in as
 .
. - Knitting program is loaded.
- The production was started.
- 1
- In the main navigation bar select
 Maintain Machine.
 - 2
- Select
 Service in the bottom navigation bar.
 - 3
- Tap the
 Yarn carrier key button.
 - 4
- Select the
 Adjust Vertically tab.
- The menu appears.
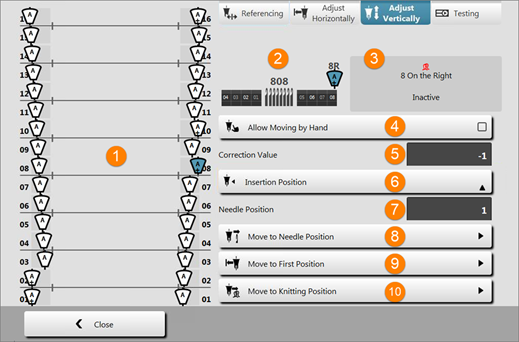
1 | Display of the yarn carrier rails with the yarn carrier type A | ||||
2 | Display of the yarn carrier position of a selected yarn carrier | ||||
3 | State of the selected yarn carrier
| ||||
4 |
| Moving by Hand allowed | |||
| The selected yarn carrier is supplied with power. | ||||
| The selected yarn carrier is not supplied with power. | ||||
| The interruption of the light curtain removes the power supply as well. | ||||
5 | Correction Value | Input of a correction value for the selected yarn carrier via a virtual numeric keypad.
| |||
6 |
| Menu for entering the desired position for the vertical adjustment of the selected yarn carrier | |||
| High Position: Move the selected yarn carrier to its highest position | ||||
| Insertion Position: Move the selected yarn carrier to the knitting position | ||||
| Deep position: Move the selected yarn carrier to its deepest position | ||||
7 | Needle Position | Input of a value for the desired needle position for using the button | |||
8 |
| Press the Move to Needle Position button
| |||
9 |
| Button for performing the yarn carrier movement Move to First Position
| |||
10 |
| Button for performing the yarn carrier movement Move to Knitting Position
| |||
 Ready to Knit
 Inactive
 Not Adjusted
 The yarn carrier is not used (manually deactivated)
 Adjustment Active

 : Moving by hand is not possible.


- 5
- Tap on the yarn carrier to be centered.
- 6
- Activate the Allow Moving by Hand
 button.
- or -
Interrupt the light curtain. - 7
- Open the covers and manually move the yarn carrier to a position where the yarn carrier can be controlled well.
- 8
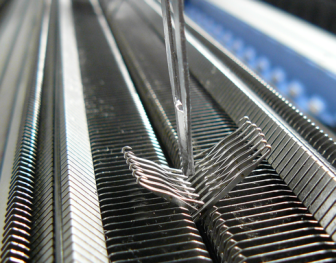
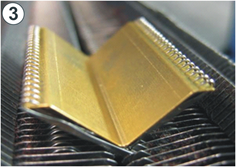
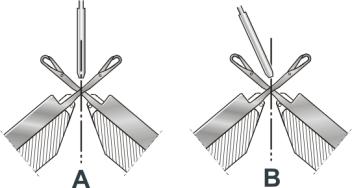
- Form a needle cross:
Possibilities of forming a needle cross | ||
|---|---|---|
Manually |
| For that purpose, manually slide upward several needles of the front needle bed and the the opposite needles of the rear needle bed. |
With shims |
|
|
|
| |
- 9
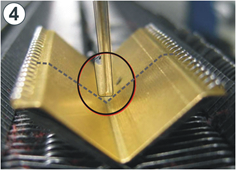
- Check the position of the yarn carrier tip.
For that purpose move the yarn carrier manually into the "needle cross" and check the adjustment.
Position of the yarn carrier tip | |
|---|---|
| |
A | Inner yarn carrier (track 7, 8 or 9) |
B | Outer yarn carrier (track 1, 2, 15 or 16) |
The adjustment is correct if the yarn carrier tip is located exactly vertically above the crossing point of the front and rear needles.
II. Centering the yarn carrier:
- You are signed in as Senior Operator .
- The covers must be closed.
- 1
- Open the selection menu by tapping
 on the (6) button.
 - 2
- Select the
 Insertion position setting.
- The yarn carrier moves to the knitting position (insertion position).
- 3
- Open the covers.
- 4
- Manually move the yarn carrier between needle bed and clamping and cutting bed.
- 5
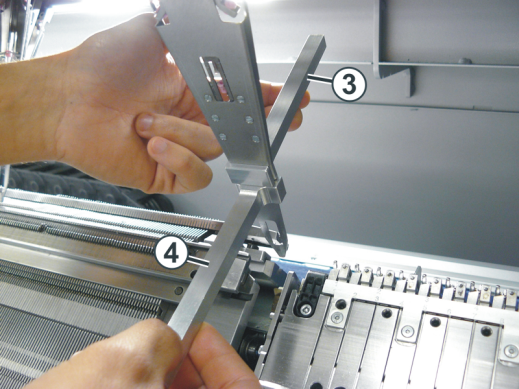
- With the help of the two adjusting levers (3) and (4) center the yarn carrier tip (.)
Procedure:
- 6
- Position the adjusting lever (3) at the connecting point "yarn carrier sliding block tip" in the upper part of the yarn carrier.
- It serves as protection for the upper area of the yarn carrier. If this area is distorted, the yarn carrier can no longer be moved upward.
- 7
- With the lower adjusting lever (4) bend carefully (without using force) the yarn carrier tip to the front or to the rear.
- 8
- Check the adjustment:
- For that purpose move the yarn carrier over the needle cross.
- The adjustment is correct, if the lower end of the yarn carrier tip is located exactly in the center of the needle cross.