ADF - ASCON from Top
Assembly of the ASCON device
This is described in the assembly instructions:
279269_00_bedan_Montage_ASCON_von_oben.pdf
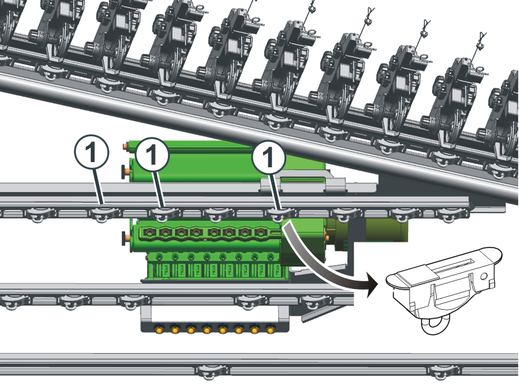
Remove yarn guide bracket
Remove the yarn guide brackets (1) (3 units) on the front yarn guide bar. The yarn guide brackets hinder the run of yarn to the yarn control unit.
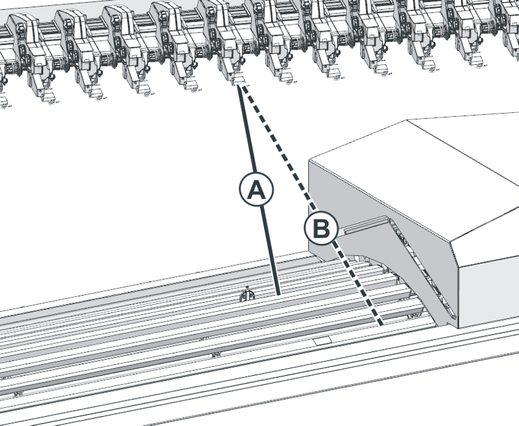
Determine height
For the ASCON device to operate correctly, you determine the height of the yarn guide device.
Measure the distance "Yarn carrier - Yarn control unit".
|
|
|
ADF 530-32 | 8R | 8R |
ADF 530-24 | 8R | 6R |
ADF 530-16 | 9R | 5R |
ADF 830-32 | 8R | 8R |
ADF 830-24 | 8R | 6R |


For doing this, proceed as follows:
- 1
- Move the yarn carrier (3) exactly below the yarn control unit (2).
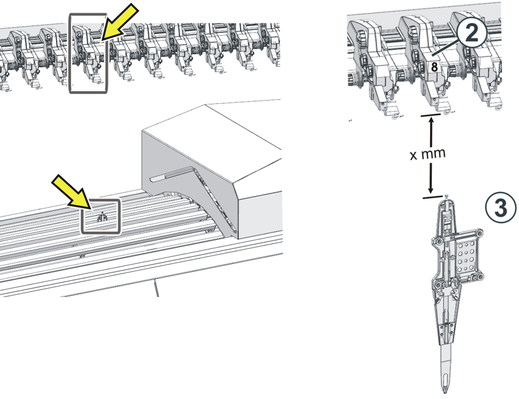
- 2
- Measure the distance "Eyelet - Yarn control unit".
- 3
- Open the Yarn Length Control menu.
 Configure Machine ->
  Machine Data ->
  Yarn Length Control
 - 4
- Tap on the lower area of the button.
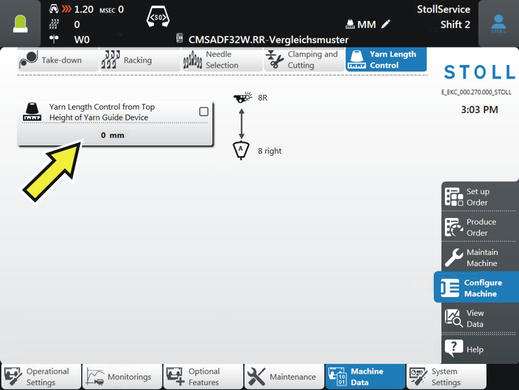
- The dialog box is opened.
- 5
- Enter the height using the virtual keyboard.
- 6
- Confirm entries with OK.
- 7
- Activate the Yarn Length Control from Top
 button.
Additional bobbin board
Recommendation: Position the bobbins on the middle and the lower additional bobbin board.
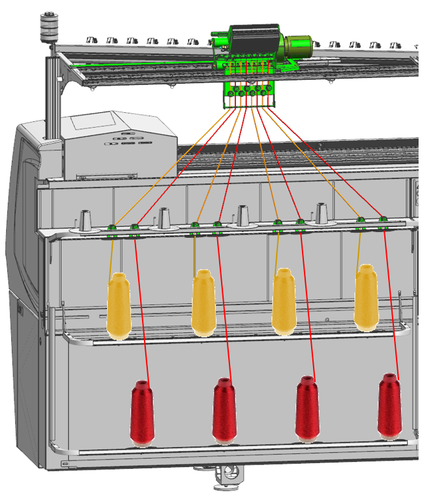
Course of yarn
There is a fixed allocation of measuring wheel, yarn control unit and yarn carrier.
This allocation effects:
- the most reduced yarn tension possible
- that the threads do not touch each other
|
ADF 530-32 | ||||||||
|---|---|---|---|---|---|---|---|---|
ASCON R
| 1 | 2 | 3 | 4 | 5 | 6 | 7 | 8 |
ASCON L
| 9 | 10 | 11 | 12 | 13 | 14 | 15 | 16 |
| 5 | 6 | 7 | 8 | 10 | 11 | 12 | 13 |
| 5 | 6 | 7 | 8 | 10 | 11 | 12 | 13 |


|
ADF 530-24 | ||||||||
|---|---|---|---|---|---|---|---|---|
ASCON R
| 1 | 2 | 3 | 4 | 5 | 6 | 7 | 8 |
ASCON L
| 9 | 10 | 11 | 12 | 13 | 14 | 15 | 16 |
| 3 | 5 | 6 | 7 | 9 | 10 | 11 | 13 |
| 3 | 5 | 6 | 7 | 9 | 10 | 11 | 13 |
|
ADF 530-16 | ||||||||
|---|---|---|---|---|---|---|---|---|
ASCON R
| 1 | 2 | 3 | 4 | 5 | 6 | 7 | 8 |
ASCON L
| 9 | 10 | 11 | 12 | 13 | 14 | 15 | 16 |
| 1 | 2 | 5 | 6 | 9 | 10 | 13 | 14 |
| 1 | 2 | 5 | 6 | 9 | 10 | 13 | 14 |
|
ADF 830-32 | ||||||||
|---|---|---|---|---|---|---|---|---|
ASCON R
| 1 | 2 | 3 | 4 | 5 | 6 | 7 | 8 |
ASCON L
| 9 | 10 | 11 | 12 | 13 | 14 | 15 | 16 |
| 3 | 4 | 5 | 6 | 7 | 8 | 9 | 10 |
| 3 | 4 | 5 | 6 | 7 | 8 | 9 | 10 |
|
ADF 830-24 | ||||||||
|---|---|---|---|---|---|---|---|---|
ASCON R
| 1 | 2 | 3 | 4 | 5 | 6 | 7 | 8 |
ASCON L
| 9 | 10 | 11 | 12 | 13 | 14 | 15 | 16 |
| 1 | 2 | 4 | 5 | 7 | 8 | 10 | 11 |
| 1 | 2 | 4 | 5 | 7 | 8 | 10 | 11 |
Configure measuring wheels
In the Setup Editor you specify, which measuring wheel operates together with which yarn carrier (Y) and yarn control unit (YCU).
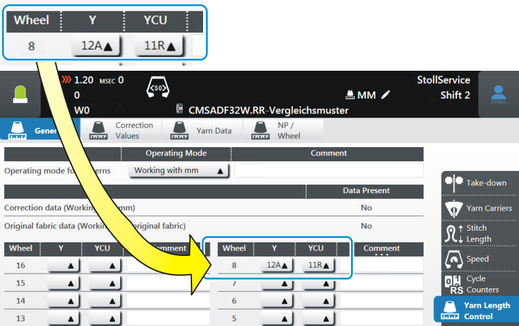
This specifications are important for the ASCON device to be able to operate correctly.
With the ADF machine the yarn length depends on which yarn carrier it is thread-up.
Threading up
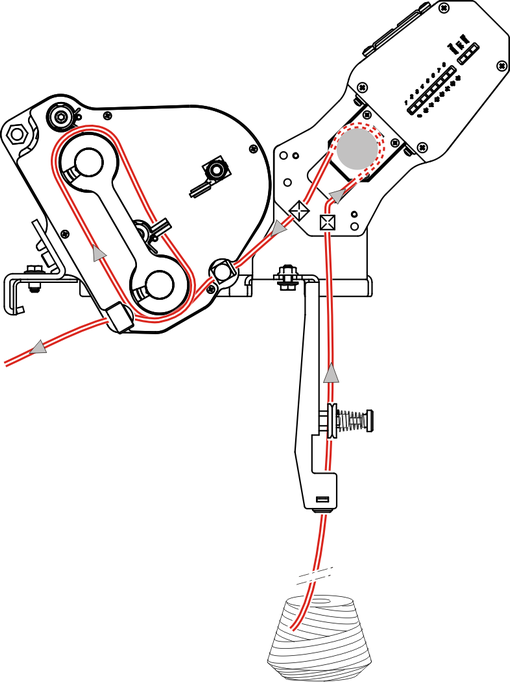
Adjusting yarn tension
The minimum tension of 8 cN must be set on the yarn control unit and on the yarn brakes, so that the ASCON device can operate correctly.
- 1
- Thread in the thread up to the end of the yarn control unit.
- 2
- Clamp the yarn end in the coil spring of the adjustment weight.

- 3
- If the weight pulls down the thread, close the yarn brake until the weight stops.
- The yarn tension is 8 cN.
For a thin, smooth yarn this yarn tension can be too low. - 4
- Remedy: hook-in two adjusting weights in the yarn and repeat point 3.
- The yarn tension is 16 cN.
If this yarn tension is too high, reduce the adjustment step by step on the yarn control unit.
Adjust all the yarn control units precisely, as the yarn tension considerably influences the measuring.
Thread the yarns through the ASCON device so that they do not cross each other.