Remove the carriage part when the carriage assembly is blocked in the needle bed
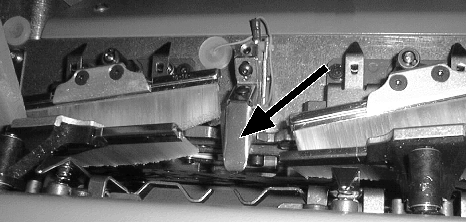
In the case of a shock on the needle bed, the piezo-electric shock stop switches off the knitting machine.
|
Shock stop motion front needle bed | Shock stop motion rear needle bed |
|---|---|
|
|


Possible causes:
- Working butts of the movable parts (needle, coupling part, intermediate slider, and selection jack) are broken. This may have damaged trick walls as well.
I. Remove the carriage part from the needle bed
On tandem machines both carriage parts in the same needle bed are raised, even if only one carriage part is blocked.
- 1
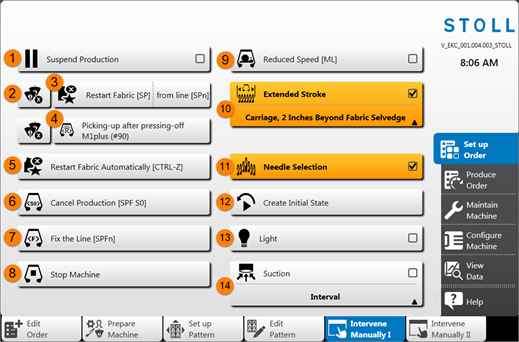
- Select the main area
 생산 작업 in the main navigation bar.
You can open the  수동 개입 1 menu via
  설정 작업 of the main area as well.
- 2
- Tap on in the bottom navigation bar: 수동
개입 1
1 |
|
| The production runs with active knitting program (default) | |
| The production is interrupted
| |||
2 |
| Deletion of the yarn carrier positions when loading a knitting program (EAY)
| ||
3 |
| 원단 재 시작 [SP] | from line [SPx]
| |
4 |
| Start (#90) 의 오동포 후 면사 걸어주기 | ||
5 |
| Cancels the current fabric, and starts automatically a new one of the current position (knitting program) [Ctrl-Z] | ||
6 |
| Cancel production [SPF S0] and continue on an empty row | ||
7 |
| Fix the Line [SPFn] | ||
8 |
| Stop machine | ||
9 |
| Reduced Speed [ML] | ||
10 |
|
| The carriage only moves over the knitting area | |
| The carriage always moves over the entire needle bed | |||
11 |
| Switch needle selection on or off | ||
12 |
| Create Initial State | ||
13 |
| Switch light on and off | ||
14 |
| Switch on or off the vacuum device by selecting Permanent or Interval. | ||


 : The machine runs with empty carriage stroke starting with the next reversal until the button is deactivated.


- 3
- Deactivate the
 of
of  니들 선침.
 - The needle selection in the front and rear needle bed is switched off.
The key is white.
 - 4
- Then, switch to
 모니터
생산 in the bottom navigation bar.
모니터
생산 in the bottom navigation bar. - 5
- Open the 원사 우수 window with the
 원사 우수 button.
 - Display of all yarn carriers: Plunger of active yarn carrier
 at bottom
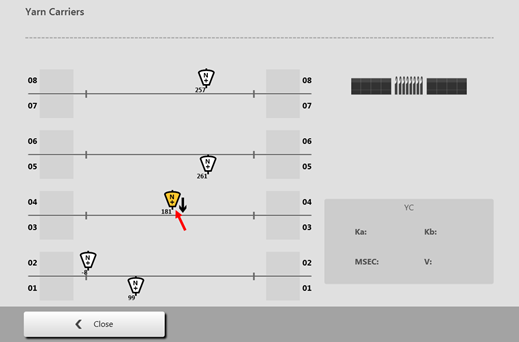
- 6
- Tap on the symbol of the active yarn carriers.
- 7
- Tap a second time on the yarn carrier to pull up the plunger
- or -
Tap the button to switch off all yarn carrier plunger.
- or -
Select 유지보수 기계 /
  서비스 in the main navigation bar.
 - 8
- Open the 케리지를위한 서비스 기능 window with the
 케리지 button.
 - 9
- Press the
 key.
key. - All yarn carrier plungers are pulled up.
- 10
- Push all yarn carriers outward.
Central lubrication
If a central lubrication is present, swivel it into mounting position.
- 11
- Deactivate the of
 40 볼트.
 - 12
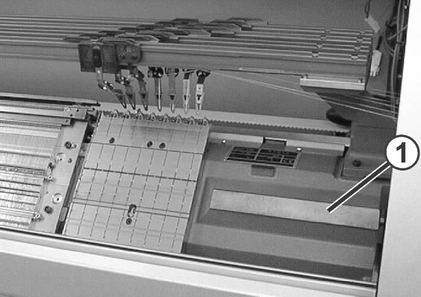
- Remove the carriage assembly panelling (1).
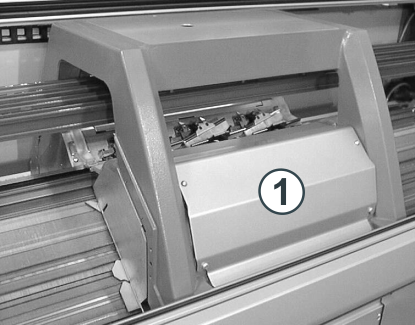
Pay attention to the needle detector when removing the rear carriage part.
- 13
- Remove the suction tube on the carriage assembly.
- 14
- Loosen the shoulder screws (2) and screws (4) on the left and right sides.
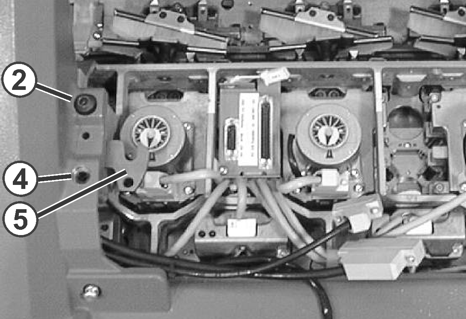
- 15
- Swivel left and right swiveling plates (5) inward.
- 16
- Set and tighten the screws (4) evenly, with it the carriage part is raised off the needle bed in the process.
- 17
- Loosen the screws on the plugs (3) and pull out the plugs.
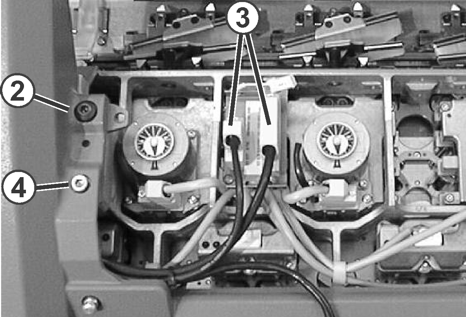
- 18
- To lower the carriage part again, loosen the screws (4) on the left and right-hand sides.
- 19
- Remove the screws (4).
- 20
- Exit the Yarn Carrier 원사 우수 window with the < 닫음 button.
- 21
- Press the
 메인 모터의 브레이크 해제 [>!] button under 수동
개입 2.
메인 모터의 브레이크 해제 [>!] button under 수동
개입 2.
주목

Damage to needles and knitting system!
There are still needles in the knitting system.
When moving the carriage assembly in the other direction (opposed to the carriage direction), the needles and knitting system can be damaged.
- Do not change the pushing direction of the carriage assembly!
- 22
- Push away the carriage assembly.
- 23
- Lift carriage part from needle bed.
- 24
- Check the carriage part and the needle bed.
If the carriage assembly is blocked:
The drive brake has automatically closed.
II. Check and clean the carriage part and the needle bed
Do not remove metallic parts and fragments (e.g. broken needle latch or needle hook) with a magnetic tool. There is a danger that the needle bed or cams can be magnetized, leading to incorrect selection.
-
Check the cams for damage.
Remove broken working butts of the movable parts (needle, coupling part, intermediate slider, and selection jack). -
Check the needle bed for damage.
Remove broken working butts of the movable parts (needle, coupling part, intermediate slider, and selection jack).
If trick walls are damaged, they have to be repaired.
- 1
- Clean the selection systems with a clean cloth.
- 2
- Clean the cams with a cloth and check them for wear and damage.
- 3
- Remove fragments if necessary
- 4
- Apply oil onto the cams with a brush.
For further information about cleaning the knitting and selection systems refer to the operating instructions.
III. Put the carriage part on:
- 1
- Mount the carriage part on the left or right outside the needle bed in such a way that it contacts the support surface (1).
- 2
- In the main navigation bar select the main area Maintain Machine.
- 3
- Select Service in the bottom navigation bar.
- 4
- With the Carriage button, open the Service Functions for the Carriage window.
- 5
- With activate the setting .
- The function is activated and the button is now displayed in yellow.
- 6
- Press the Release drive brake [>!] button.
- 7
- Push the carriage assembly right over the carriage part.
- 8
- Deactivate again the power supply .
- 9
- Uniformly screw in the shoulder screws (3) until the carriage assembly is raised somewhat.
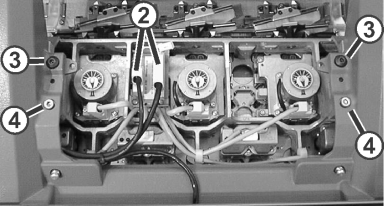
- 10
- Swivel the left and right swiveling plates outward below the carriage assembly.
- 11
- Tighten the screws (3) and (4) uniformly.
- 12
- Insert the plug (2) and screw-in the safety screws on the plugs.
- 13
- Bring the yarn carriers into their basic positions.
- 14
- Mount the suction tubes on the carriage assembly.
- 15
- If necessary, bring the swiveled central lubrication again into working position.
- 16
- Assemble the carriage assembly panelling.
- 17
- Switch on 40 V power supply.
- 18
- Exit the window with
 OK.
OK. - 19
- In the main navigation bar select the main area Set up Order.
- 20
- Then, in the bottom navigation bar select Intervene Manually I.
- 21
- Press the
 Cancel Production [SPF S0] button.
 - The knitting program is set to an empty row S0.
- 22
- Start the machine with the engaging rod.
- 23
- Move the left carriage to the reversal point.
- 24
- Switch needle selection on if necessary
- 25
- With the
 Create Initial State button recover the initial state of the machine
- or -
Return to 오더 편집 to re-start the order.
 - 26
- Tap the
 작업 시작 key.