Couple Carriage Assembly Wide
- You are signed in as Senior Operator
 .
. - A knitting program is loaded.
- 1
- In the main navigation bar select
 Set-up Order.
 - 2
- Open
 Edit order in the bottom navigation bar.
 - 3
- Press the
 Exit production button:
- The loaded order was completed.
- 4
- If necessary, save the order.
- 5
- Select
 Intervene Manually I in the bottom navigation bar.
 - 6
- Tap the
 Cancel Production [SPF S0] button.
- If the loaded order was not yet saved, a prompt appears for saving the changes and the machine is set to an empty row.
- 7
- If necessary, save changes.
- 8
- Start the machine with the engaging rod and stop it again when the carriage is located shortly after the left reversing position.
- 9
- In the main navigation bar select the main area
 Maintain Machine.
 - 10
- Select
 Service in the bottom navigation bar.
 - 11
- With the
 Carriage button, open the menu.
 - 12
- With
 deactivate the setting
  .
.
- The power supply 40 V is deactivated and the button is now displayed in white.
- 13
- If necessary, press the
 Release drive brake [>!] button.
- The carriage assembly can be moved manually.
- 14
- Open and remove the rear panel segments.
- 15
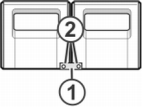
- Loosen screws (2) and remove coupling rod (1).
- 16
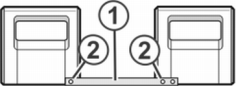
- For wide coupling (tandem machine), push the right carriage to the right until the coupling rod (1) can be assembled.
- 17
- Insert the screws (2) and tighten.
- 18
- Remove the carriage part in order to replace the cams.

With the wide coupling you have to exchange the cam parts for reasons of safety.
- 19
- Place carriage part on contact surface and assembly with carriage assembly.
- 20
- Close the rear panel.
- 21
- In the main navigation bar select the main area Maintain Machine.
- 22
- Select Service in the bottom navigation bar.
- 23
- With the Carriage button, open the menu.
- 24
- With activate the setting
 .
.
- The power supply 40 V is activated and the button is now displayed in yellow.
- 25
- With the
 OK button return to the previous window.
 - 26
- Engage machine.
- The machine stops and the Coupling width ? error appears.
- 27
- Engage the machine for executing the reference run
- The reference run is executed to know the used coupling width.
- 28
- More in the chapter for Tandem with or without comb.