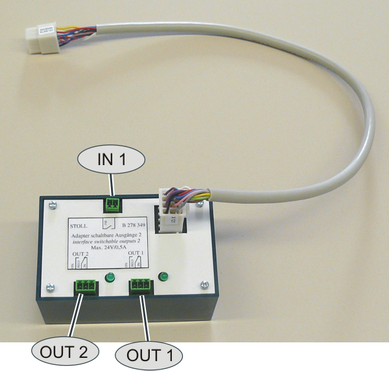
Adapter for Switchable Outputs 2 (ID 278 349)
|
OUT1 OUT2 |
Two potential-free relay outputs which enable external devices to be switched on and off (a maximum of 24V/0.5A) are available. |
|
IN1 |
An input is available to which a potential-free switch NC or NO contact can be connected. |
The devices are switched on or off by the knitting program.
|
Command |
|
|
OUT1=n |
Switch on/off device 1 (on: n=1, off: n=0) |
|
OUT2=n |
Switch on/off device 2 (on: n=1, off: n=0) |
|
IN1 |
Specify the behavior of the machine |
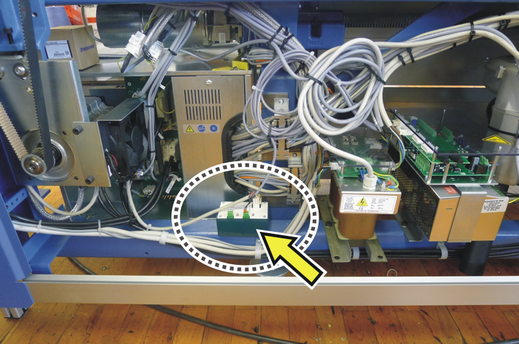
Assembly

- 1
- Switch off main switch.
- 2
- Open the rear panel segments.
- 3
- Plug the adapter to the control unit.
- 4
- Plug-in the cable for "OUT1", "OUT2" and "IN1" to the adapter.
- 5
- Close the rear panel segments and switch-on the main switch.
- 6
- If you don't use the "IN1" input, execute a "Warmstart".
- 7
- If you want to use the "IN1" input, execute a "Restart & Configuration".
|
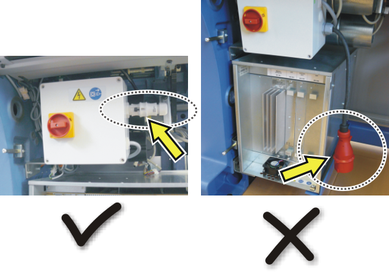
EKC machine |
Plug-in "XL/XR 121" plug into the "X 121" socket of the right control unit |
|
OKC machine |
Plug in the "XL/XR 121" plug into the "X 121" socket of the left or right control unit (depending on machine type) |
Use
- You can use the "OUT1" and "OUT2" outputs with the OKC and EKC machines.
- You can use the "IN1" input only with machines with single-phase power supply. This depends on the type of computer of the knitting machine.
|
|
Computer Type |
|---|---|
|
OUT1 |
EKC2 |
|
IN1 |
EKC2
|
|
* Machine with single-phase power supply
|
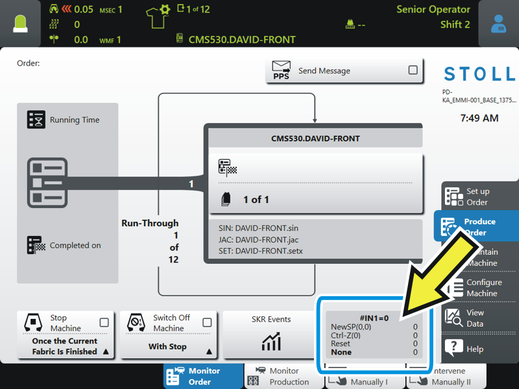
Activate the display of "IN1".
 Cấu hình máy ->
  Hoạt động Cài đặt ->
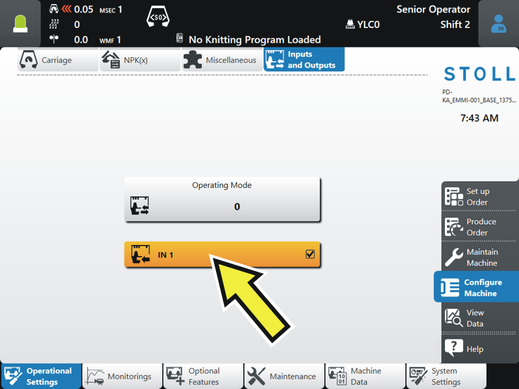
If the input is activated, the following points are possible:
- The "IN1" input can be checked without a knitting program (see section "LED on the adapter").
- During production, the status of IN1 is displayed.
LED on the adapter
If the or command is executed by the knitting program, the corresponding LED lights up on the adapter.

Manual check of the LED:
|
EKC machine |
Activate "OUT1" – LED for "OUT1" lights up Activate "OUT2" – LED for "OUT2" lights up
"IN1"
"IN1" |


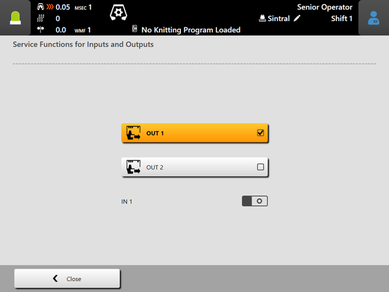
 - External signal "0" is present
 - External signal "1" is present
|
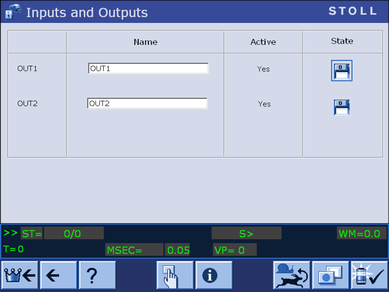
OKC machine |
Machine settings -> additional function keys -> Switchable outputs
Activate "OUT1" (switch on "1") – LED for "OUT1" lights up Activate "OUT2" (switch on "1") – LED for "OUT2" lights up |
 ->
->  ->
-> 
Example for using the input "IN1"
A specific yarn shall be monitored for knots. For monitoring the yarn, an additional external knot detector is used.
A knot appears for example during a bobbin change. The knot leads to a quality defect, the fabric is unusable. The fabric does not need to be completed and is to be started again automatically.
Use the new adapter and complete the knitting program so that the machine quickly terminates the faulty fabric and starts a new one.
- The knot is detected
- The knot is knitted-in
You specify the number of knitting rows in the knitting program. - The fabric is aborted
In the knitting program you specify the behavior of the machine. - A new fabric is started.
In the knitting program you specify, how the machine should behave:
|
CTRLZ(x) |
The machine automatically begins with a new fabric if the following conditions are met:
x = Number of rows until the execution of the action |
|
NEWSP(x,y) |
Cancel the current fabric and start it again. x = Number of rows until the execution of the action y = Line number to start the knitting program with |
Example 1
Example with "CTRLZ" (minimum specifications):
|
30 START |
Line 33-34: Before activating (#IN1=1;), at least two stitch rows must be knit. Line 50 - Reset #IN1 Line 70 - Activate automatic CTRLZ with #IN1 If a knot is detected, the "CTRLZ" command will be executed after 6 rows. Set the quantity of rows that high in order to get the knot knit-in before the fabric piece will be started. Line 400 - Deactivate #IN1 |
 If you work with "NEWSP", replace the above mentioned specifications for "CTRLZ(x)" with "NEWSP(x,y)".
Example 2
Controlled areas and areas without control:
|
|
The fabric pieces consists of three areas (A, B, C):
|
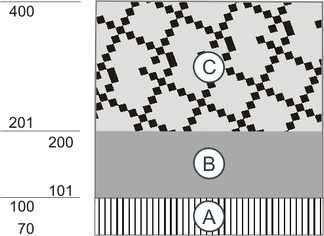
|
30 START |
Additional specifications: Line 70 – Control the area (A) Disable line 100 – #IN1, area (B) will not be controlled Line 200 – Control the area (C) Line 400 - Deactivate #IN1 |
Example 3
Extension with conditions:
|
30 START |
Line 240 – Condition, if a knot is detected from this line onwards. Only 4 rows are required before the "CTRLZ" command is executed. The second "#IN1=1" specification is necessary to activate again "#IN1=1"
Line 360 - In case of error, the "F:CANCEL-PROCEDURE;" function created by you will be executed. A new fabric is started after 8 knitting rows. The second "#IN1=1" specification is necessary to activate again "#IN1=1" |
Normally Closed or Normally Open
According to its design, the knot detector in its home position is NC=Normally Closed or NO=Normally Open.
The examples above use the "#IN1=1;" command in order to enable the monitoring. This is the command if an is used for the control.
With a , you have to use the "#IN1=0;" command instead.
Tip
Make a note of the position of the external knot detector, so that you don't need to adapt the knitting program if it is to produce again at a later time.
Reason: The number of rows until a knot is knitted-in depends on the position of the external knot detector. The number of rows is entered in the knitting program.