Configure measuring wheels
Define this items for the measuring wheels in use:
- Measuring wheel
- Yarn Carriers
- Yarn data (optional)
- Correction values (optional)
With this program point you specify, which measuring wheel works together with which yarn carrier and which yarn thickness is used.

Take care of a standardized assignment of yarns to yarn carriers and measuring wheels! Assign to each other already on the M1plus in order to get these data into the Setup file.
Configure measuring wheels on EKC:
- Call up the tab.


 Setup-Editor
  tab
tab
- Select the yarn carrier to be assigned to the respective measuring wheel in column Y.
- Call up the tab.
- Set the value for .
Default = 15 %
If this value is exceeded when determining the correction values, the machine will stop automatically and an error message appears.
- The measuring wheels are configured.
All assigned yarn carriers must be entered in the YG line of the knitting program.
Key | Function |
|---|---|
| Call up the |
| Call up the Setup2 editor |
| Confirm entries |
| return to the window |
| Call up Main menu |


Configure measuring wheels on OKC:
- Call up the Yarn length control window from the .
- In the window call up the Setup2 editor.
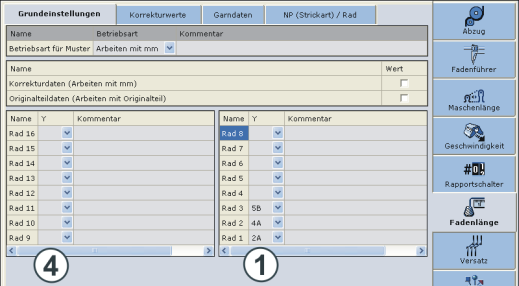
- tab
Select the yarn carrier to be assigned to the respective measuring wheel in column (1).
If a second ASCON device is used, activate the allocation in the (4) column.
- Confirm entries.
- Call up the tab.
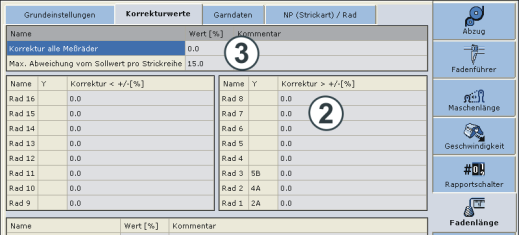
- Enter the correction value.
- Adjust the value for (3) (default: 15 %).
If this value is exceeded when determining the correction values, the machine will stop automatically and an error message appears.
- Confirm entries.
- Call up the tab.
- Enter data.
- Confirm input.
- The yarn consumption can be calculated now
- The measuring wheels are configured.
- Return to the Yarn Length Control window.
Allocation Measuring wheel - yarn carrier
The allocation measuring wheel - yarn carrier will additionally be displayed in the window (column ). This is helpful for setting up the machine: You don't need to be switching back-and-forth among the different windows .